
Week 1 – Idea generation.
Its finally that time of year again! Time to begin the final major project of my second year at college. The theme we were given for this project was ‘Mystery’. Here is a quote that was given in the briefing:
“If you could reveal any mystery, what mystery would you
reveal; what would it look like, how would it sound, what
might it smell, taste or feel? Finally, how might it impact the world”?
To start of my idea generation, I needed to analyze the theme a little bit. To me, the word ‘Mystery’ makes me think of stories, unknown creatures, entities and the paranormal. This theme is intentionally vague, which is good as it leaves a lot of opportunity to branch out and put some personal twists on my project. The first things to pop into my mind when I first read this quote was Cryptids such as Mothman, Bigfoot or the Wendigo. Documented sightings, but never enough conclusive proof to really identify the Cryptids appearances. They will always be shrouded in Mystery.
To further stimulate this idea generation, I decided to watch a Youtube series created by the youtuber ‘Wendigoon’. He is a great youtuber who creates well researched, and long essay style videos on horror stories, cryptids, and even real life events.
This video was an incredible watch and really did open my eyes to how, despite how many of these creatures have never been officially documented or recorded, there is always eerily similar signings, and similar stories and myths which makes Cryptids and the mystery surrounding them so fascinating.
Another avenue of mystery that I wanted to cover fits into the dystopian category. I was listening to the artist Jazz Emu on spotify and his song ‘The real me’, which is a Joke song about how his life is a simulation controlled by teenage boy in the future.
“Another teenage boy in the year 8345,
Who’s playing on a simulation of his life,
And that every time he moves, he is feeding the minds,
Of the overlords who keep him all suspended in slime,
I can see him and he’s feelin’,
Their tiny little tentacles which tickle him to keep him from sleeping,“
I specifically found these lyrics very amusing, but also kind of creepy. There is a reason why there is so many different religions and beliefs about the world and how people view life, and the whole ‘life is just a simulation’ is not out of the question. This is because we don’t really have a definitive answer to why we are actually here. Just thinking about this makes me feel uneasy and question reality, and the mystery of life. I was also reminded of the Matrix, which is a legendary movie based on this idea.
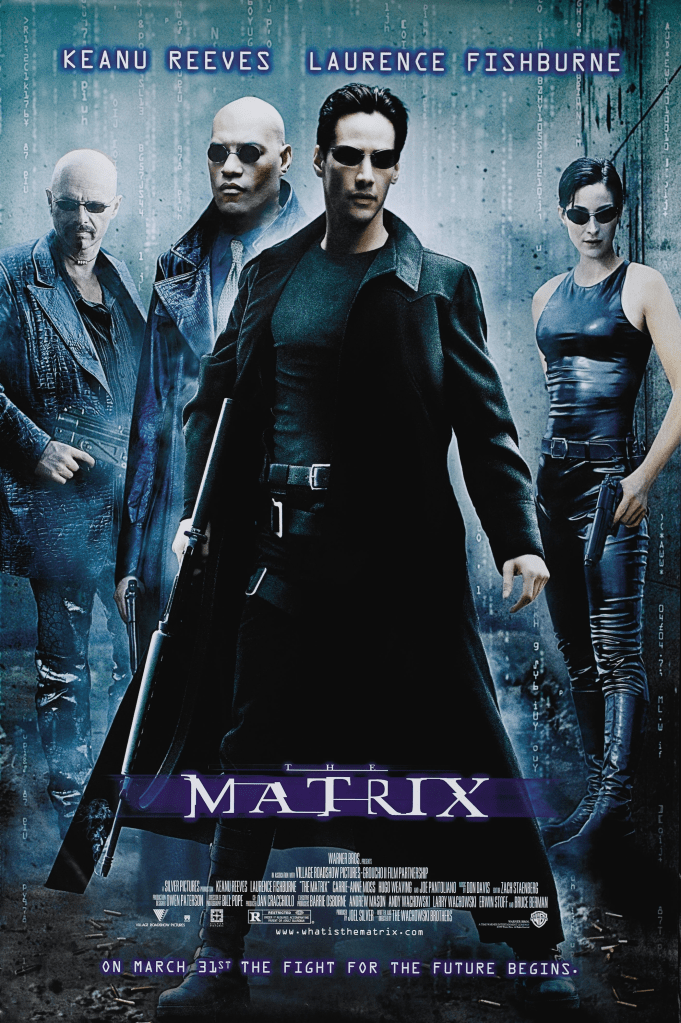
The Matrix. (1999). [Film]. New south wales: Warner Bros, Village Roadshow Pictures, Silver pictures.
The matrix is a great movie which represents a large mysterious entity, in a dystopian setting. In the Matrix, humans are being harvested by a robot artificial intelligence takeover, there thoughts and bodies being used as batteries for the large robots which rule earth. These harvesting towers and stations have all of the humans plugged into a simulation of the real world. All the humans have no real perception of the real world.
Its a really interesting movie, and made me question the mystery of life myself. Could we also be in a simulation?
Overall, I have watched some great media, which I believe has kickstarted some really nice ideas to fit with the theme ‘Mystery’.
Week 2 – Pitch creation and presentation.
Now that I have researched my theme, and watched some great inspirational media, its time to put together some original ideas for my project.
Project idea 1 – Cryptid VR game experience:
It is no secret that I am a massive VR enthusiast. I believe that VR is one of the most immersive ways for a story to be told, simply due how physical and immersive the gameplay is.
My idea would be to create a simple unity project, where the player needs to explore a dark forest area, and as they follow the path of the environment, they will find little hints which allure to the presence of a famous cryptid. To finish off the experience, they player will come face to face with the cryptid. (not sure which one I would choose as of right now)
This is a great idea as it really embraces the storytelling aspect of Mystery. Combine that with VR, and you have a fun and engaging experience.
This is a great project as unity is actually quite a weak area of mine. Whilst I am good at using things such as lighting, custom materials and post process effects to create a good looking scene, my actual coding knowledge is very limited. This opens up a good avenue for learning new skills.
Project idea 2 – Cryptid avatar base
Another not so well secret of mine is that I create content for avatar bases, and have even made my own unique avatar base before in the past. I a very active user in the social VR community, but I also appreciate that similar models and bases can be used for other communities such as streamers, or just render artists.
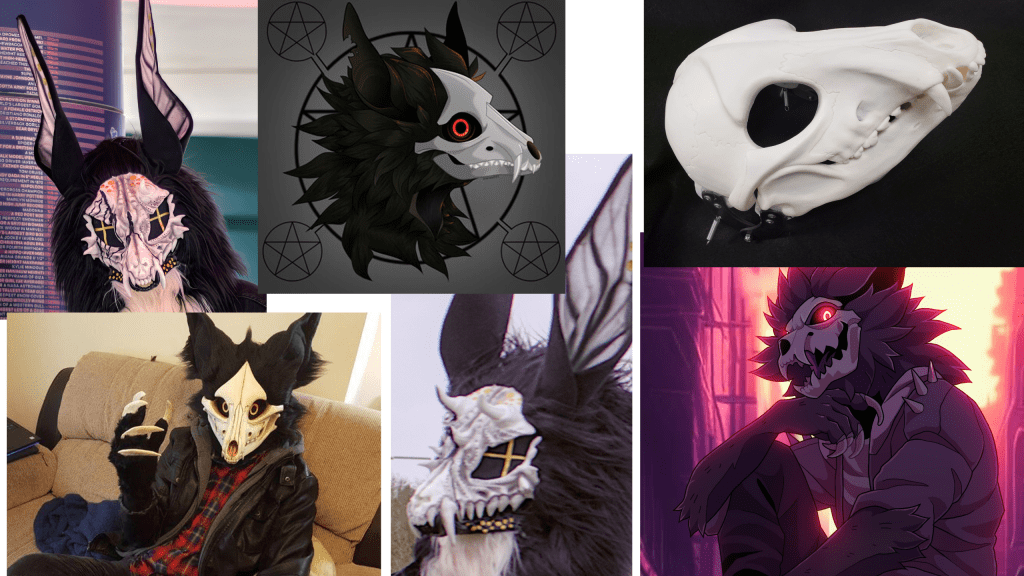
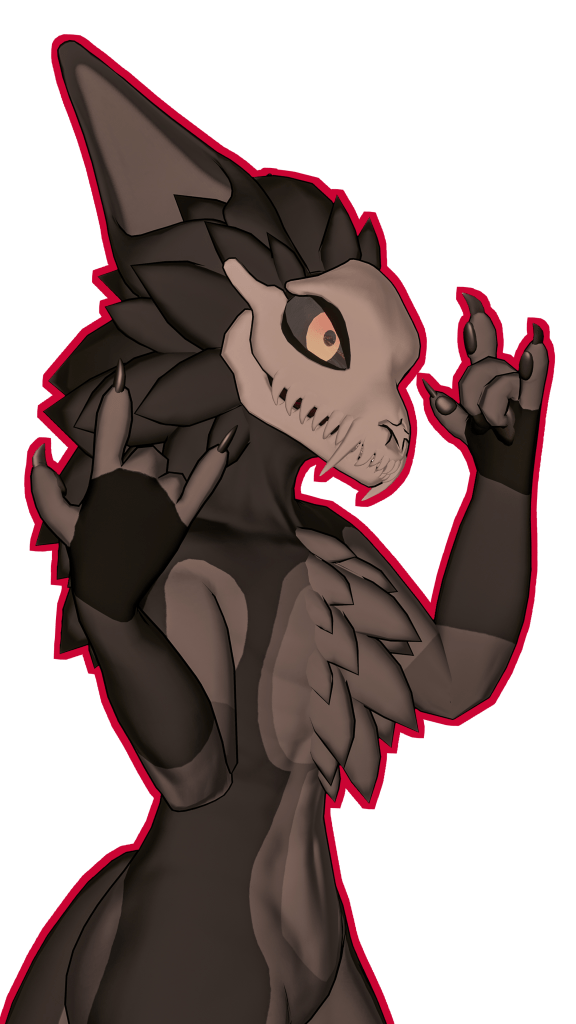
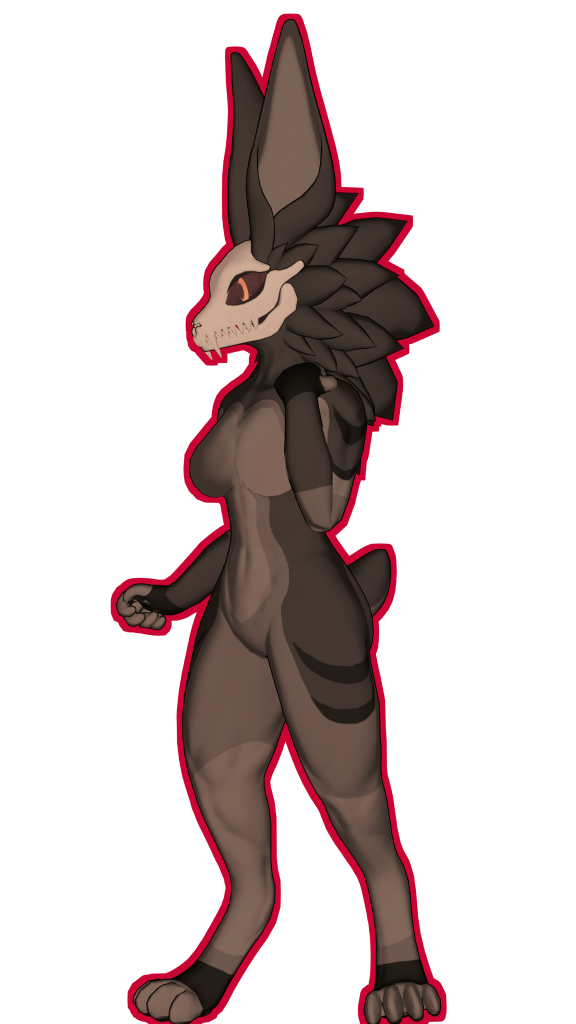
My idea would be to create a 3D model character, which is part of a made up species, similar to the Wendigo. I love the idea of a skull for a face, it adds to the mystery of the model, as you are unable to see what its face truly looks like, what emotions it may be feeling. This 3D model would be fully rigged, low poly with neat topology, lots of customizable shapekeys and options for different body types and features, easy to use UVs to make painting your own version easy, and viseme shapekeys.
The biggest draw to this project would be the opportunity to research. As a well established asset creator for this community already, I already have an active community to interview, and get lots of interesting first hand audience research. For example, I can send out an email blast to over 900 customers of mine asking them to fill out a form about what stuff they like to see on avatar bases, and use this information to hone in this product as something my target audience will want.
here are some mood boards that I made to showcase the vibe I would want the project to look like.

Project idea 3 – The Matrix inspired animation
My final major project last year was an animation inspired by the Initial D anime. This turned out really well, however I have improved a lot since then. This project would be a great way to showcase how much I have improved. It would be done mostly in blender.
The main story for the animation would be to animate a regular video from a first person perspective, perhaps somebody out at a dinner date with someone, or walking through a sunny park. As the seemingly normal animation continues, I would hide little details in the video which hint at something being off, perhaps make things a little too perfect, have objects ‘glitching’ about. eventually the video would show a glimpse of the ‘real world’, which would be our protagonist waking up from the simulation temporarily.
This would fit with the mystery theme really well, and hopefully make users who watch this animation feel anxious and question reality themselves.
Presenting the pitch
First of all, I created a google form to ask my class some questions regarding my project ideas. This information will help me narrow down what ideas may be the most valuable to people, and my target audience. I asked the following questions:
- Is Virtual Reality a better platform for immersive storytelling?
- Have you ever tried a VR horror game?
- Do you use your real face and name to display yourself online?
- Have you ever used a fictional character, or original character as a profile picture?
- How would you describe your online identity?
- If someone told you that your entire existence is actually just a teenage boy playing a computer game in the year 3247, that we are simply just NPC’s in a future supercomputer, and all of our thoughts and actions are actually predetermined, would that make you slightly uncomfortable?
With many of these questions, I also got the users to explain why they has these opinions or thought a certain way. Questions such as the final one, are meant to prompt feelings of discomfort. If I had lots of people expressing discomfort from the idea of living in a simulation, it would prove that my third idea would be a good choice.
Once I had my responses, I put together a simple presentation with some bullet points and visuals to help visualize my ideas a little bit, and used the responses to back up my ideas.
Many of the responses I got were very positive and reinforced my original ideas, besides the matrix animation. Many people seemed to not really care if life was a simulation, which made me loose a bit of faith in that project idea.
Conclusion
From the research I did, I came to conclusion that the avatar base idea is the best. Not only is it the idea I resonate with the most, over 80 percent of people who answered by survey said that they don’t use their real face online, and use either something else, such as anime profile pictures, or original characters to present themselves online. This proves that there is a market for this type of product.
The other main reason is the research opportunities. I already have such a large fanbase of dedicated customers, the research I will be able to gather for this project will be very easy for me to obtain, and will be more realistic to creating a product for an chosen target audience, than just interviewing classmates.
Contingency plan:
| Dates | Activity | Resources |
| 26/02/2024 | Idea generation, first hand audience research | Internet, Movies, Video games, google forms. |
| 4/03/2024 | Pitch presentation creation, Performing pitch | Google slides, all previous research, 3-5 well thought out ideas. |
| 11/03/2024 | Sketching, 3D model planning, moodboard creation, concept art. | drawing tablet, painting software (medibang/photoshop) |
| 18/03/2024 | Audience research. First hand and second hand. Base model case studies. | Google forms, Virtual reality equipment to perform interviews. WordPress. |
| 25/03/2024 | Project creation (cleanup research if needed) | Blender, Medibang, Unity |
| 1/04/2024 | Project creation | Blender, Medibang, Unity |
| 8/04/2024 | Project creation | Blender, Medibang, Unity |
| 15/04/2024 | Project creation | Blender, Medibang, Unity |
| 22/04/2024 | Organise project files into easy to use Unity packages. Storepage pictures (renders) | Blender, Medibang, Unity |
| 29/04/2024 | Finalise wordpress, get all the writeups ready for submission | WordPress |
- Thinking ahead with the project, bases are a very time consuming project, there is a lot that needs to be done. In case I do not have time to model the entire full body, I should focus on finishing the head first in full detail just in case I run out of time
Week 3 – Research, Concept art and 3D modelling references
Before I start drawing anything, I want to have a closer look at some other successful bases, and see what I can learn from them.
Nardoragon case study
Nardoiri. (2021). Nardoragon. [Online]. Gumroad. Last Updated: 14th July. Available at: https://nardoiri.gumroad.com/l/Nardoragon [Accessed 11 March 2024].
The Nardoragon is a popular avatar base with over 1000 reviews on the store page at the time of writing this, 98% of which are 5 star reviews. It is an anthropomorphic dragon with lots of customizable fluff options, good optimisation, and support for programs such as Beat Saber, ChilloutVR, NeosVR, LIV, VSeeFace and most importantly Vrchat. It also has a very active community, with over 7000 active members.
I personally really like how they have done the Fluff, especially around the head area, and I also really like the digitigrade legs. Its not over the top, so it will still move realistically with a standard humanoid rig, even in complex poses.
I also love how expressive this avatar base is, there is so much emotion behind so many of those shapekeys, it easily allows people to show real life emotions, and express themselves fully through this avatar.
Novabeast case study

Kittomatic. (2023). Novabeast [VRChat Avatar]. [Online]. Gumroad. Last Updated: 31st December. Available at: https://kittomatic.gumroad.com/l/Novabeast [Accessed 11 March 2024].
The Novabeast is a very recent VRChat avatar that was uploaded only a few months ago. In its 3 month timeline of being released it has over 700 reviews on its store page, and a discord community of over 4,500 active members.
It has clearly taken some inspiration from the Nardoragon with its main body shape, however the digitigrade sits a little lower with on this base, which I actually prefer the look of very much. I also love how the fluff has been dealt with on this model. If you look a little closer at the cheek areas, it has a few layers of 3 big fluff spikes, which look really clean and nice. I also love the large pointy ears, I would love to take some inspiration from the pointy ears and headfluff, I think its very nicely done.
Another thing which I like about this model, which not many bases do is come out the box with a pre set up shader. The outline and shading is using a shader called liltoon (https://lilxyzw.github.io/lilToon/#/) which is a free custom unity shader. This really makes it stand out on the store page pictures and I defiantly will be doing a similar thing for my base.
Sketching a modelling reference
To help me with modelling, I need to draw a turnaround sheet, with all the proportions of my model roughly sketched out, from a front and side view. This will help getting my desired look translated into 3D a lot easier.
Turnaround sheets are a very important part of character creation, and are used across the industry for many things, usually to help others draw/create your character accurately.
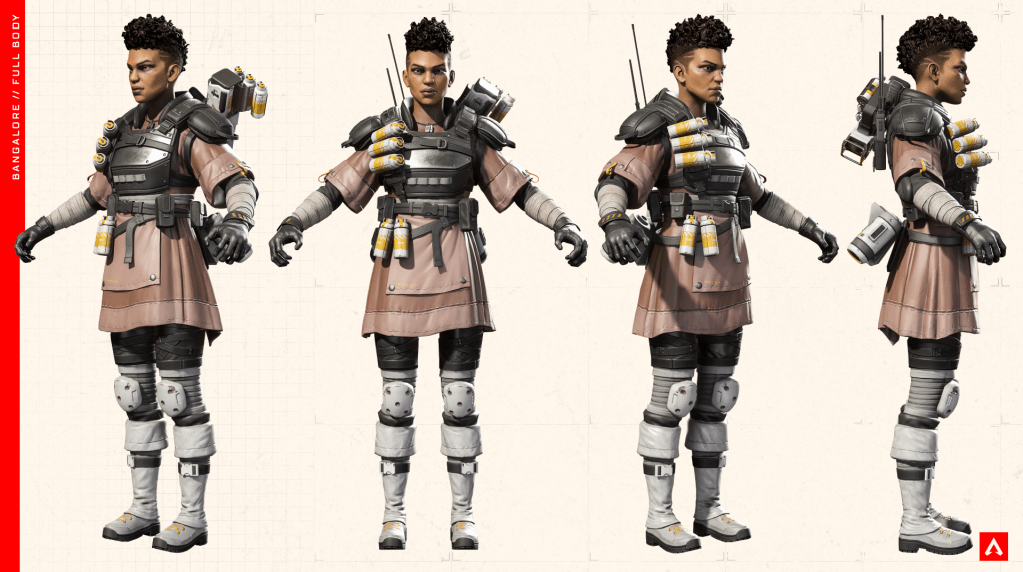
Electronic arts. (2019). Apex legends cosplay guides. [Online]. EA. Last Updated: 4 February. Available at: https://www.ea.com/games/apex-legends/community-resources#cosplay-guides [Accessed 11 March 2024].
I always love to reference the Official Apex legends cosplay guides as great examples of turnaround sheets. Whilst they are rendered with existing 3D models, an probably not the original concept designs, I still think demonstrate how to show all areas of a character clearly. I also love how professional the pictures are presented, and I also really appreciate how its in a T pose, I think drawing my reference in a similar style will look professional, and really help with the proportions for the model.
For this drawing I’m going to be using Medibang paint pro, and a drawing tablet. Whilst Medibang isn’t Industry standard like photoshop is for concept art, it is still a very powerful free little piece of software, and is very easy to use. It will make sketching out these drawings much easier. Here is a quick overview of the UI, and what tools I will be using for these projects:
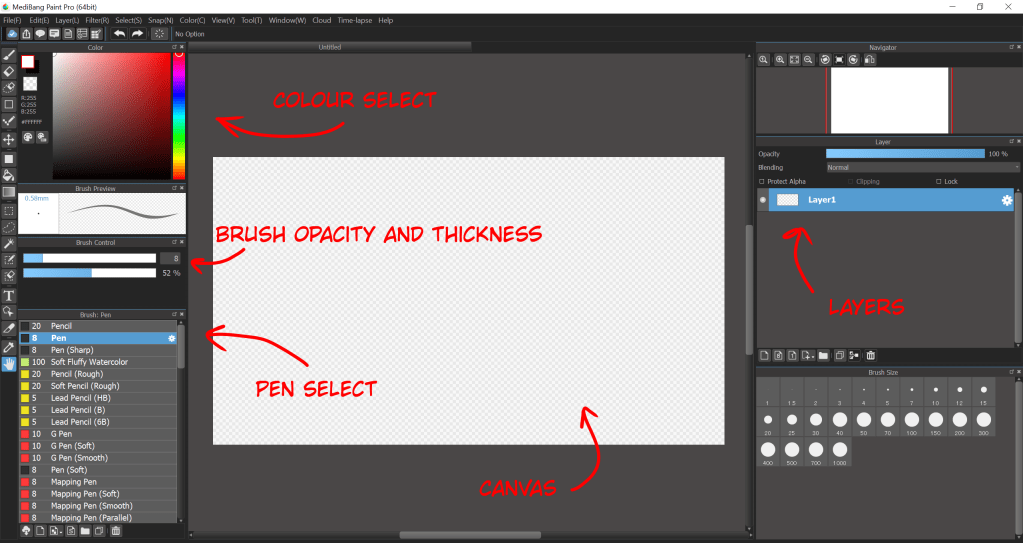
I will be mostly using the pen tool, with a reduced opacity. this allows me to create rough lines, and go over them to define my preferred shape, similar to how a real pencil will actually work.
I will also be using the layers to and colour selector to keep things like the fluff on separate layers. This will help with visibility when modelling, as I will probably start working on the fluff mesh after I have finished the base model.
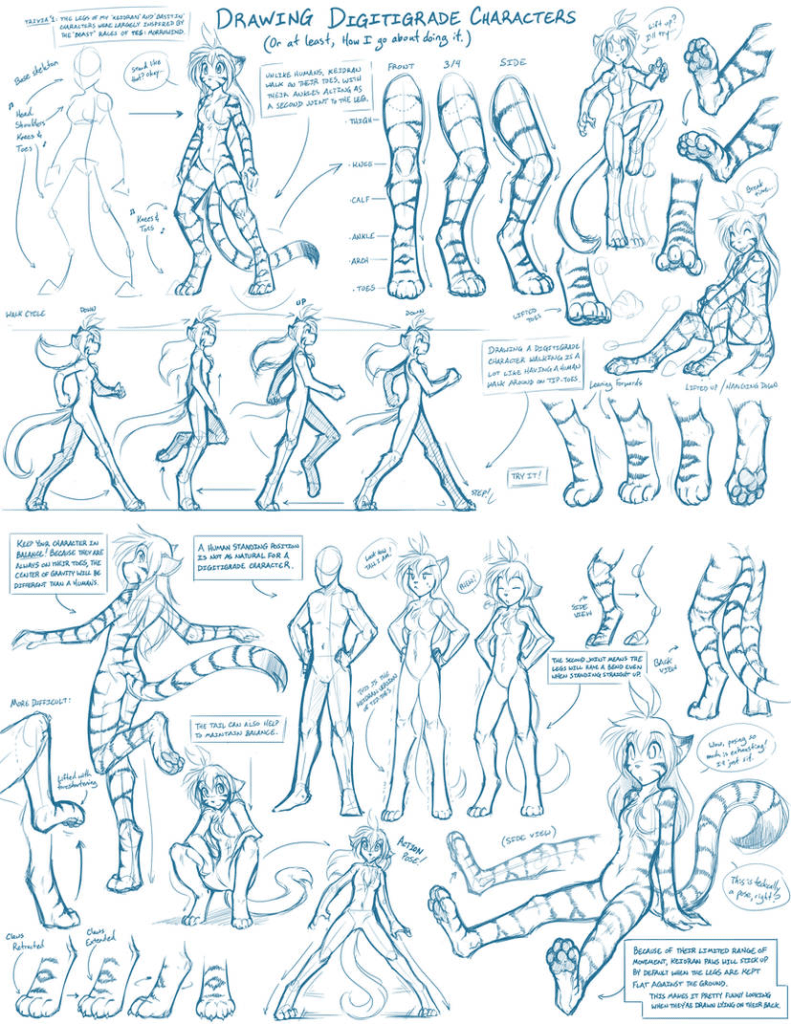
Twokinds. (2014). Digitigrade Legs Guide. [Online]. Deviantart. Last Updated: March 10th. Available at: https://www.deviantart.com/twokinds/art/Tkturials-Digitigrade-Legs-Guide-439423997 [Accessed 12 March 2024].
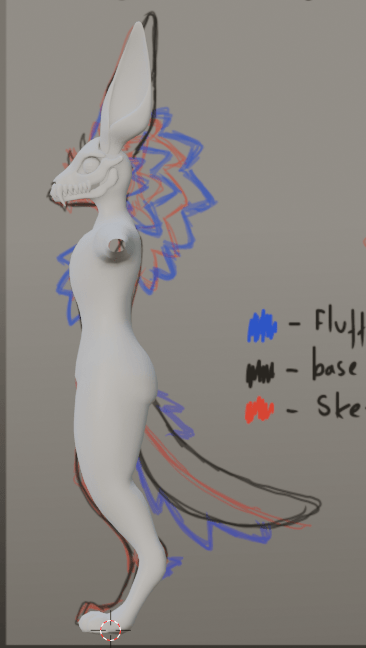
To get the shape of the legs right in this sketchy phase, I found this really in depth tutorial on DeviantArt which had a lot of useful tips on getting the proportions correct. The side view was a very useful reference. Here is the sketch that I came up with:
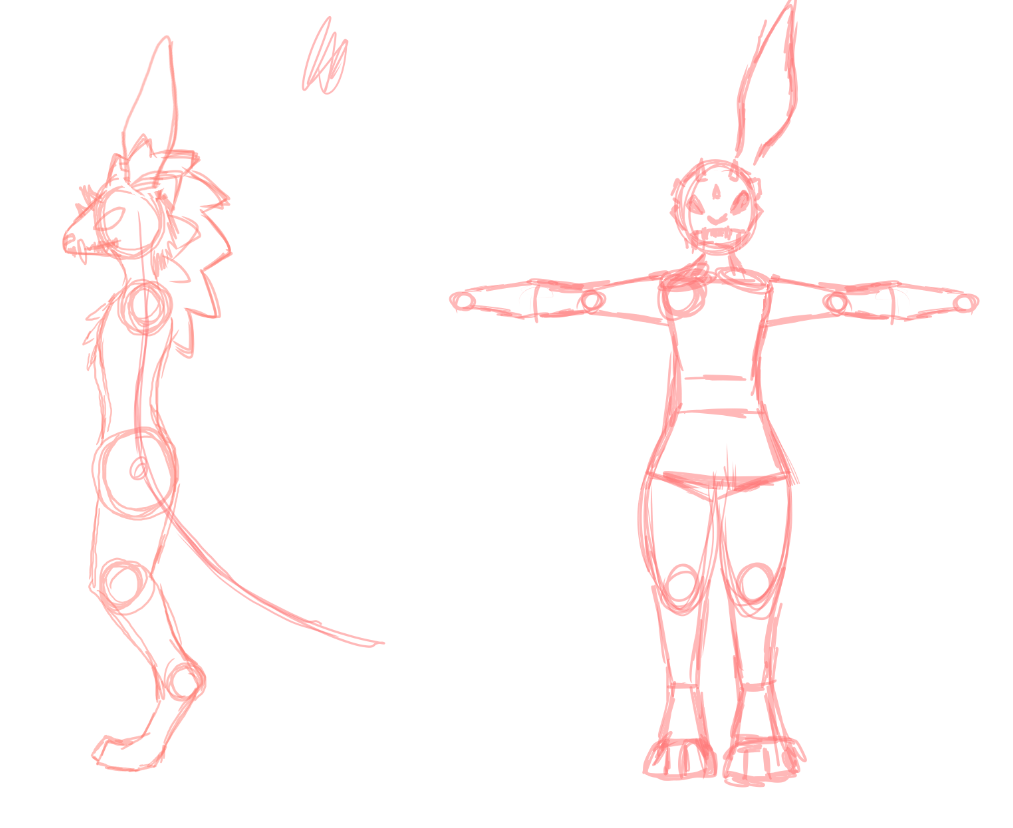
I went over this sketch in a black pen to have a more clear reference for the base body. I used a blue pen to mark out where I want the fluff to be, this will be especially useful for the head area. I also made sure to keep looking back at the Novabeast as a reference as I really like how the headfluff looks on that base model.
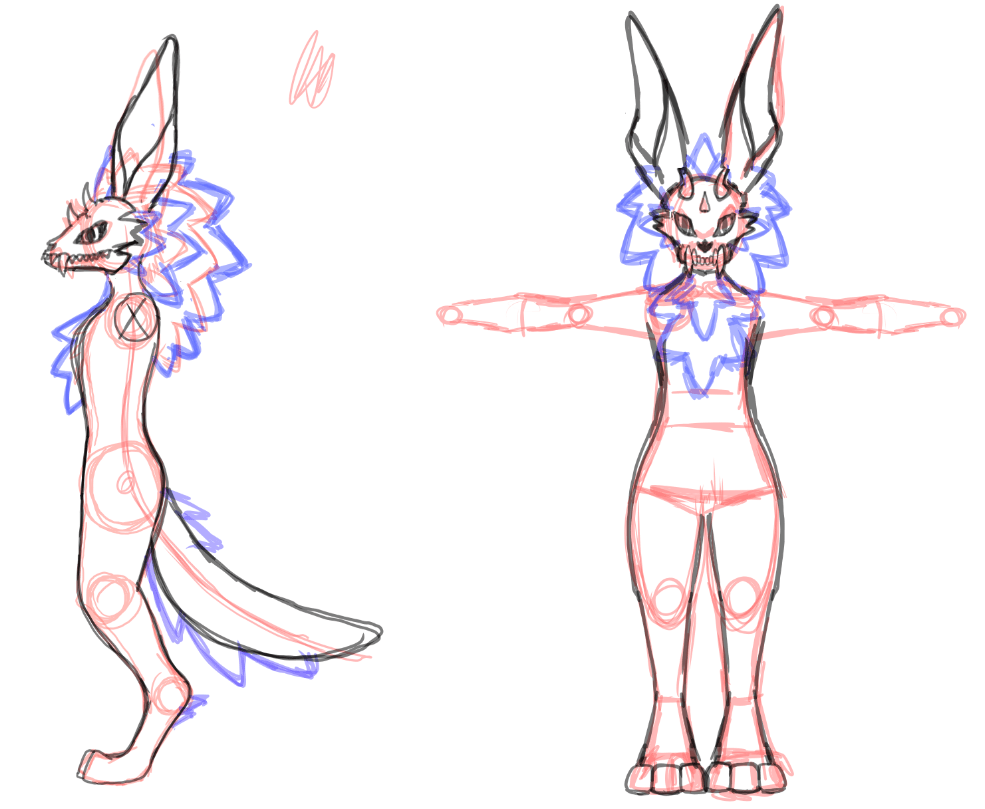
Overall I am super happy with these references, I think they will really help with proportions in the final model.
Next I wanted to draw a more detailed close up of the skull head, simply to get a better reference for when I get to the finer details during the modelling process.
I started off with a sketch, similar to how I started the previous drawing. I also created a new top layer to draw the lineart on. I would keep this lineart layer on the top, so the colours don’t overlap the lines. I tried to keep the lineart minimal for the skull cracks and details, as I wanted the shading to make them stand out.
I did two shading layers, and I followed the sketch lines as a reference on where to put the shadows. I didn’t want to do any complicated sun directions with this drawing, I just wanted the cracks and details to be clear, so I figured this would be a good way to make it defined without being a confusing reference. For the second, darker layer of shading I copy and pasted the original shading, changed the brightness, and used the eraser tool to fit it within the original shadow lines. This created a super nice and simple 3D effect.
To finish off the drawing, I added a third shading layer, which was used on the eye holes, and teeth which are further back. This added a bit of depth to the drawing, and helps with not confusing the teeth locations.
Finally I drew the eye, using Medibangs circle drawing tool. I used a slight gradient on it to make it not look so flat.
Overall, I am very happy with this drawing. As someone who is not very confident using drawing tablets, I was really proud of myself when I got the final result. I believe it will be a very useful reference drawing when I get to the finer details stage of the modelling process.
Finally, to finish off these drawings, and present them nicely like how the apex legends references are, I put all my sketches together in one large 16:9 picture.

In conclusion, I am very happy with these drawings and think they will be very useful for modelling as a reference. I would love to do some 3/4 angles, and a piece of concept art which is a fullbody of the entire character, however for the sake of this time constrained final major project, I need to manage my time sensibly.
Week 4 – understanding my target audience with primary research.
I’m going to need a lot of information about what features my target audience wants, so that I can make a product that people would want to download/buy. I decided to put together a bunch of questions that would help me understand why people like certain avatars.
- What do people like about their favourite bases?
- What features do you like your avatar to have pre set up with?
- How important is poly count to you?
- How common are skull characters?
- Features you wish other creators worked harder on?
- How interested would you be in trying out a free skulldog inspired base?
As mentioned before, my target audience are going to mostly be social vr players and maybe a few streamers. Most of these people will also be members of the Furry fandom, due to my other products people know me for, and the similarities my base will have to skulldogs, which is a popular species choice for members of that community.
I put all of these questions together in a simple google form, so I could gather information in a simple layout. Here is what the form looked like:

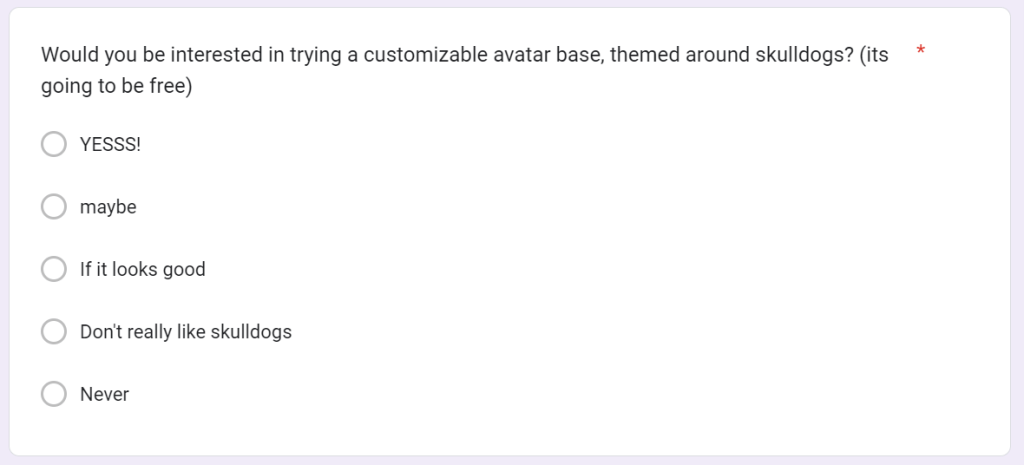
(I tried to save as a PDF, but google forms doesnt export very well, so here are some screenshots. You can also view the form here: https://docs.google.com/forms/d/1oF2ohyUQAP7-qOyb2TfzSOfyOOFvWkT6StKZbhzjDP0/edit)
I decided to send out an email blast to all of my customers who had made purchases from my gumroad store, which included a link to this form. I already know these customers are creators who are in the market for buying avatar bases and similar clothing assets for avatar creation. This email was sent over to roughly 900 customers, however here are the statistics of people who actually opened the email
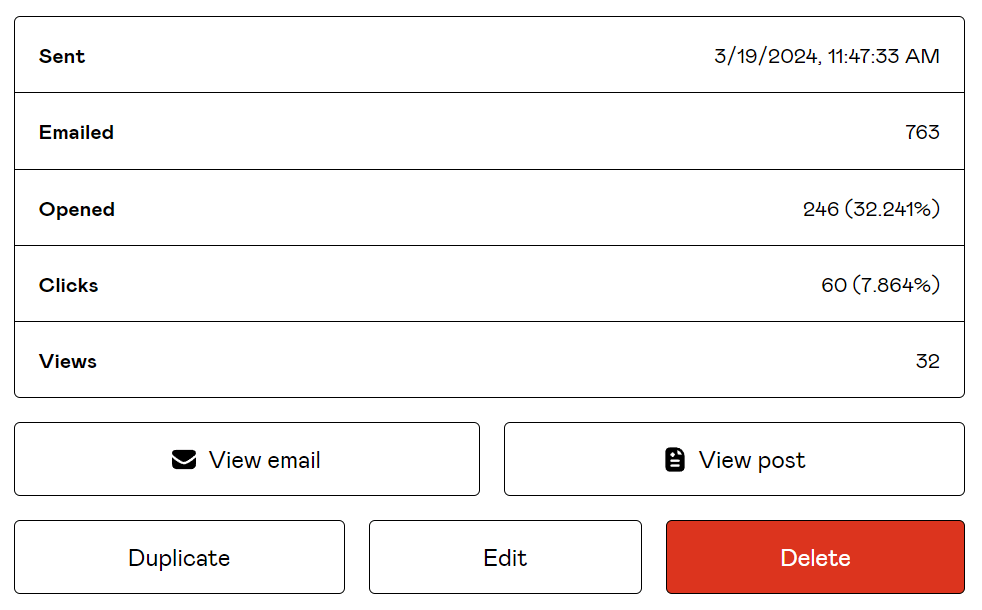
I also made an announcement in my community Discord server, which has over 300 members, all of which are frequent social VR players.

Understanding the responses:
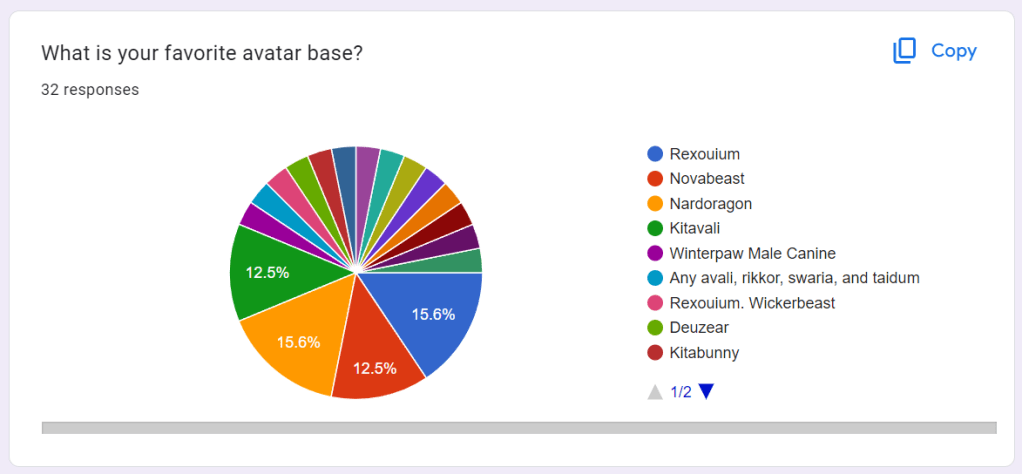
Whilst lots of the responses were very different for almost everyone who answered the survey, there was some consistancy with some of the most popular bases, such as the Rexouium, Novabeast, Nardoragon and Kitavali (Two of which being the ones in my case studies earlier)
Whilst I was expecting a bit more consistency, its actually not a bad thing, as the follow up question asks the users why its their favorite base. This allows me to collect a LOT of different data.
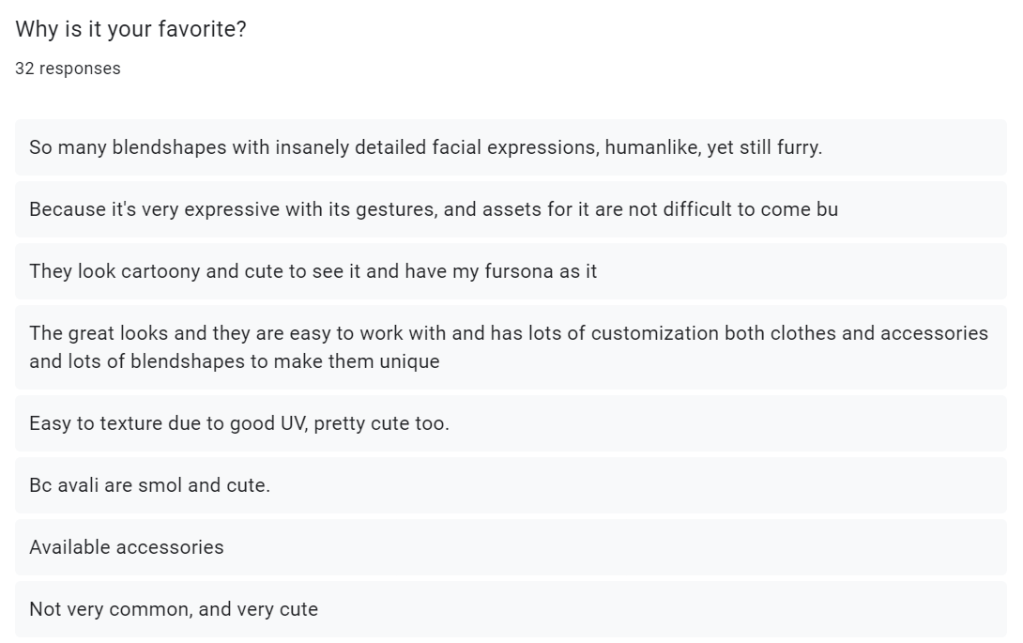
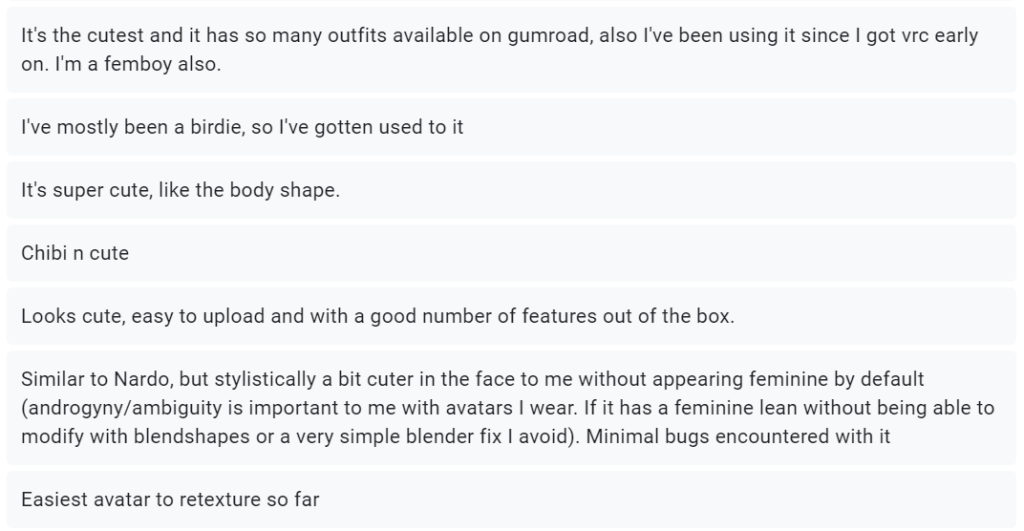
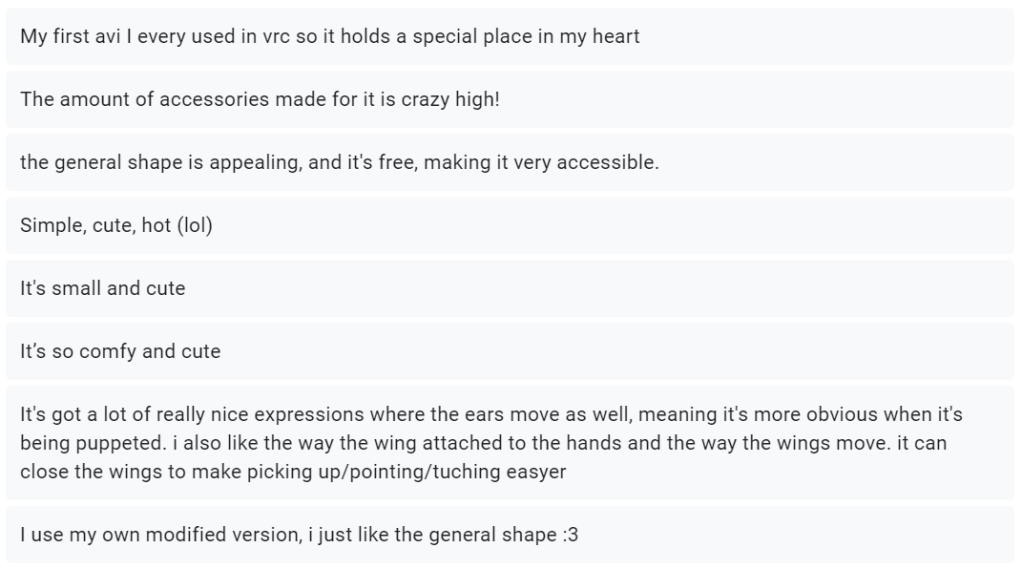
Whilst some of the responses are not very helpful, there are a lot of good mentions, and useful things to note. People like their customization. They like avatar bases to come with accessories, and they like to shop for more clothes when other creators start creating addons for the bases. This tells me that I should perhaps release the base for free, with some paid clothing bundles. The free base allows users to try it out, and encourages other asset makers to start making clothes and even more customization for the base.
People like to be able to adjust the shape of the avatar, especially when it comes to body types. A few people mention how they just like the general shape, or how it resonates with them. For my base to resonate with a wider audience, I will need adjustable shapekeys so users can tweak the body shape and type, change its gender, to their desired look.
another thing that was mention a lot is good expressions. One of the main reasons people will use an avatar, is it is a way of self expression, so being able to easily convey emotions makes sense.
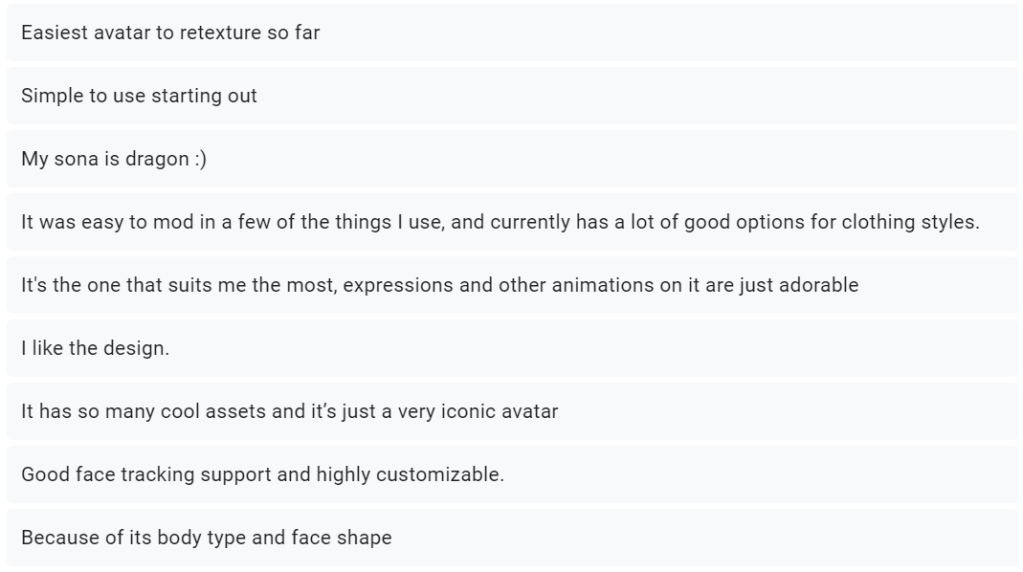
Good UVs, and easy retextures are also mentioned by a few different users. As mentioned before, the reason people buy bases is so they can express themselves, and create a unique character with as minimal effort as possible. I need to cater to the largest audience possible, so I need to make sure my product can be retextured in multiple programs, and preferably has some pre set up files so people have a solid starting point.
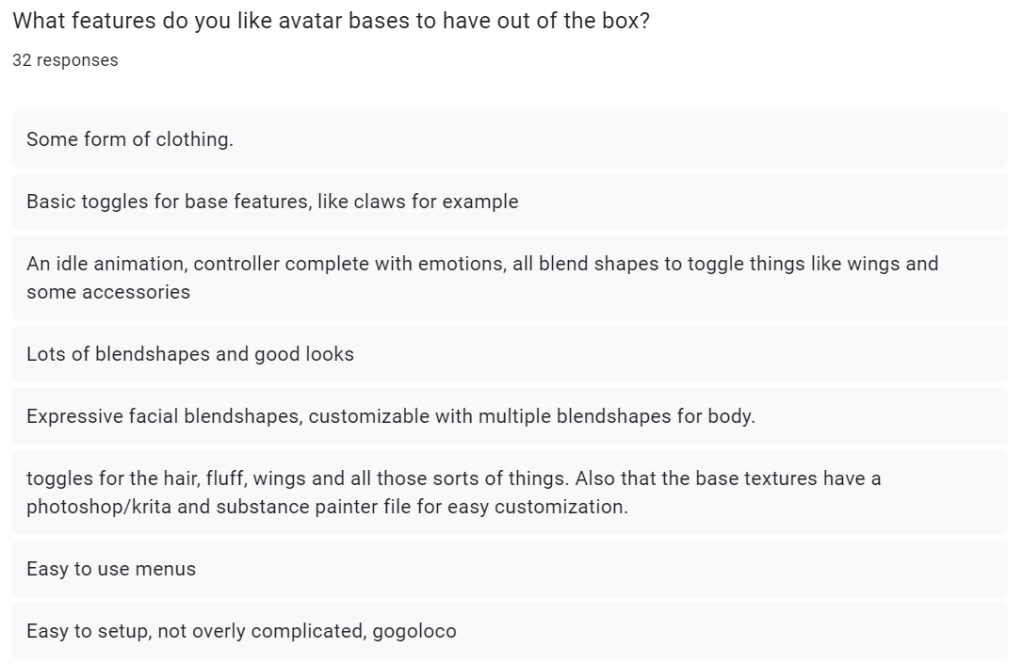
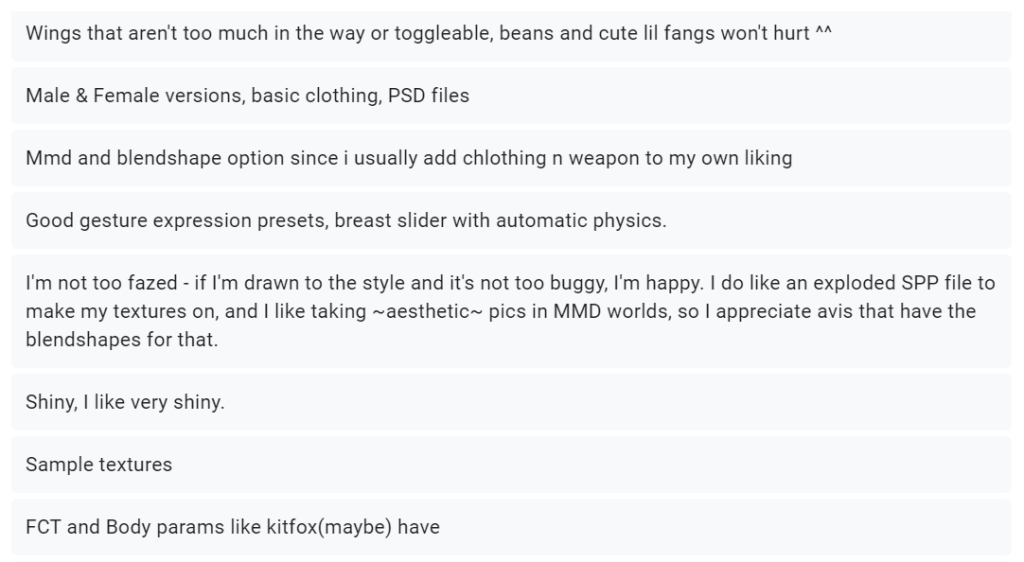
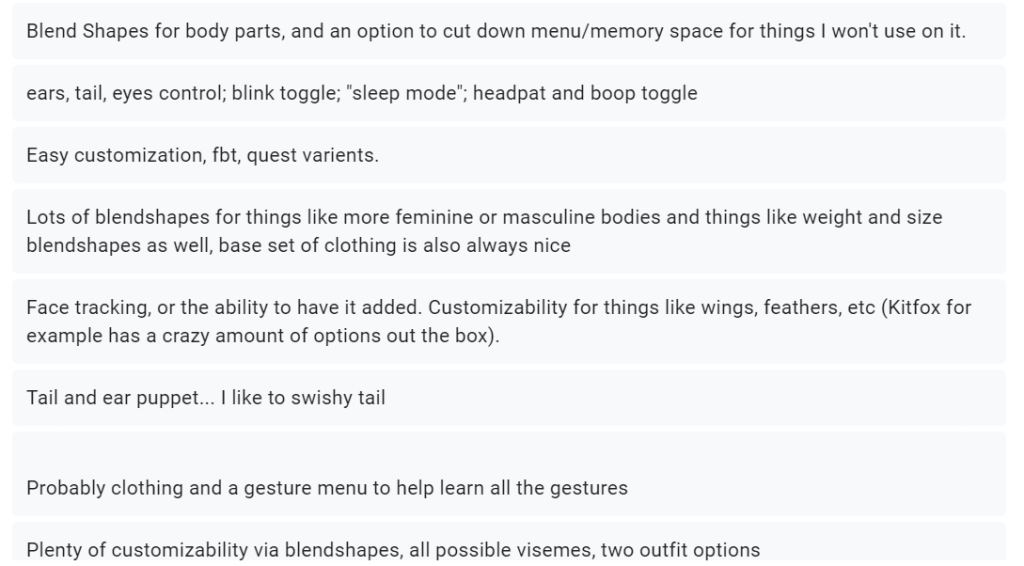
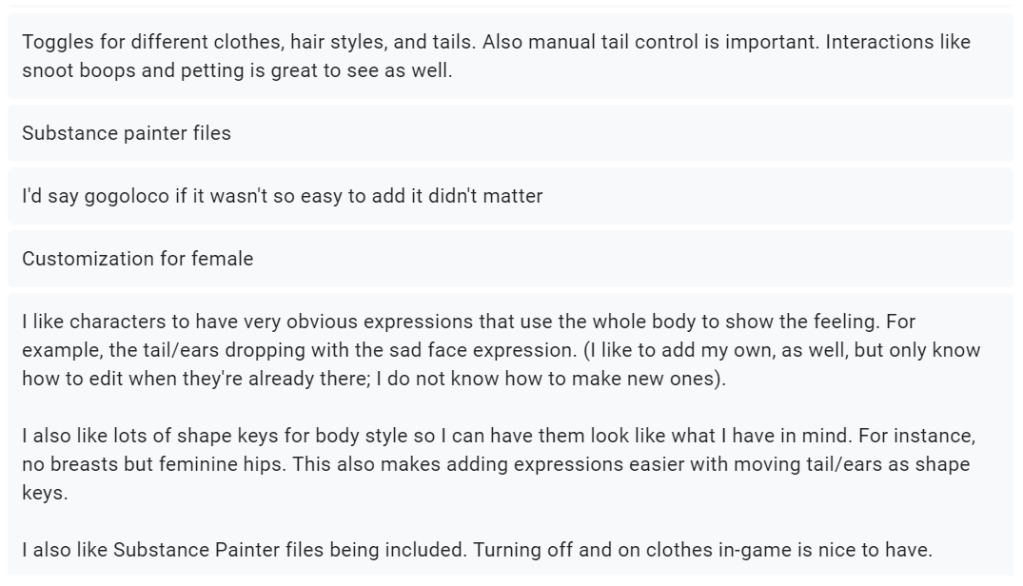
Whilst lots of these responses are more of just the same, there are a few more mentions, such as ‘movable tails’ and ‘puppets’. These people are referring to are blend trees, which are a form of animation in unity. They are used in social VR platforms to accurately change the position of parts of your character, for example face tracking, or adjusting the ears to perk upwards slightly. These adjustments can be done within game, which is super useful. I don’t actually know how to set these up, so this will be a good thing to learn.
Interactive ‘Snoot boops’ and ‘headpats’ are also mentioned. This is a feature built within the VRChat SDK, which allows two different users to interact with each other with physical touch. For example, you can set up contact receivers on an avatars hand, and create a high five interaction when touching another players hand. Again, I don’t know how to set this up, however I would like to learn how it works.
And as mentioned before, people LOVE their shapekey customization, I really will need to prioritize this, as like half the responses mention it in some way shape or form.

This actually surprised me a lot. I was expecting most people to choose 50-70k, so the fact 43.8% selected those options was no surprise. However I was not expecting 46.9% to not care about polycount. This surprises me, as VR is very demanding to run, and the cost of entry is already very high. Lots of large meetups, such as VR nightclubs, will set maximum optimization limits, so people computers don’t lag out. I think what I will do, is aim for around 40-50k polygons, but also provide extra customization, and addons for those who want an extremely high quality base.

This is an interesting one to think about, and could mean two different things. The results of this question show that my chosen species to recreate into a base is not popular. This could mean that its an untapped market, and I could be heading headfirst into a goldmine, creating something that has never been done before. However, it could also mean there is very low interest. I think by taking inspiration from my case study avatar bases (Nardoragon and Novabeast) I can present this new and unique idea, in a way that is still in the comfort zone, and familiar with my target audience.
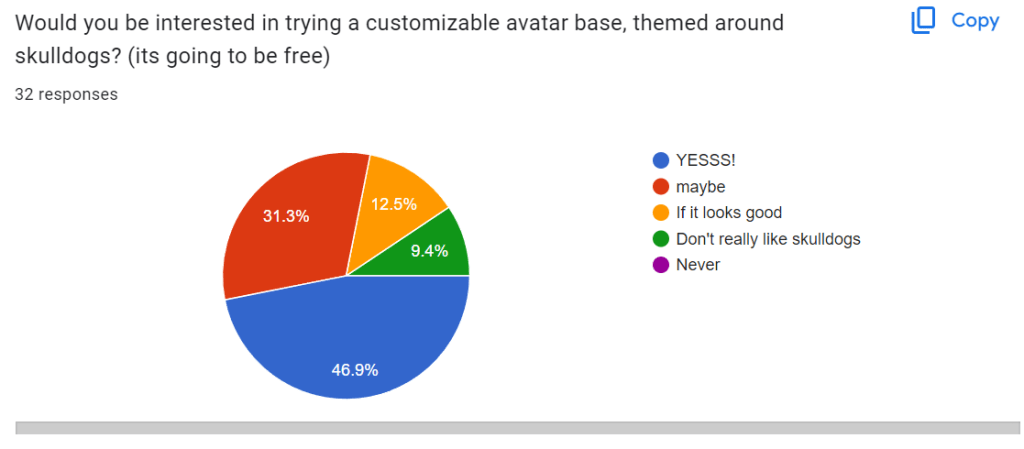
I can also prove there is some interest in my idea with this question. Just under 50% of my target audience gave every enthusiastic responses about trying a base with my unique theme, and the rest were open minded if they liked the look of it. This strengthens my point that My skulldog inspired product is a good idea, I just to keep it somewhat familiar to what my target audience is already used too.
Conclusion:
Using all of this data, I decided to put together a list which covers the basics of things I need to make the avatar work, essential features that my target audience wants on the base, and an optional list of features I can add if convenient with my time constraints.
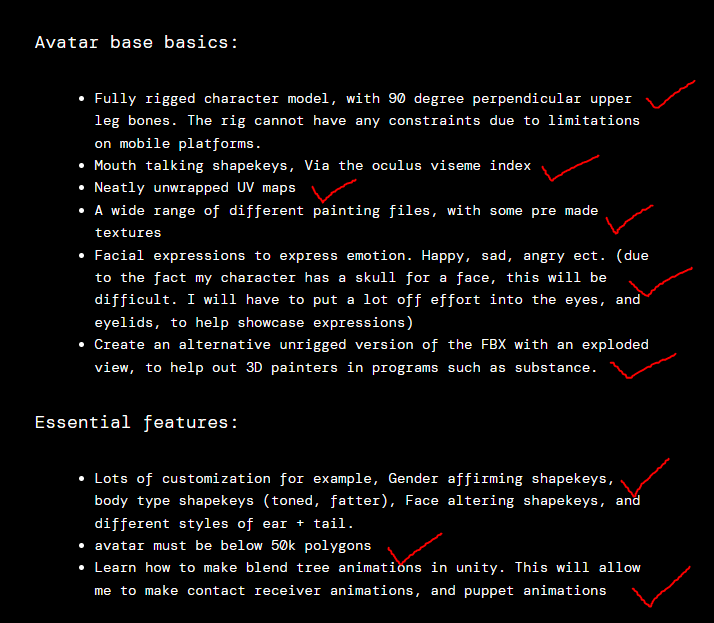
Avatar base basics:
- Fully rigged character model, with 90 degree perpendicular upper leg bones. The rig cannot have any constraints due to limitations on mobile platforms.
- Mouth talking shapekeys, Via the oculus viseme index
- Neatly unwrapped UV maps
- A wide range of different painting files, with some pre made textures
- Facial expressions to express emotion. Happy, sad, angry ect. (due to the fact my character has a skull for a face, this will be difficult. I will have to put a lot off effort into the eyes, and eyelids, to help showcase expressions)
- Create an alternative unrigged version of the FBX with an exploded view, to help out 3D painters in programs such as substance.
Essential features:
- Lots of customization for example, Gender affirming shapekeys, body type shapekeys (toned, fatter), Face altering shapekeys, and different styles of ear + tail.
- avatar must be below 50k polygons
- Learn how to make blend tree animations in unity. This will allow me to make contact receiver animations, and puppet animations
Non essential features (if I have time):
- Clothing bundles
- Sound effects for certain gestures and expressions
- Lower poly version for android platforms. (the normal poly version will work fine, but it gives mobile users more breathing room when it comes to limitations on file size)
Week 5 – Starting the blender project.
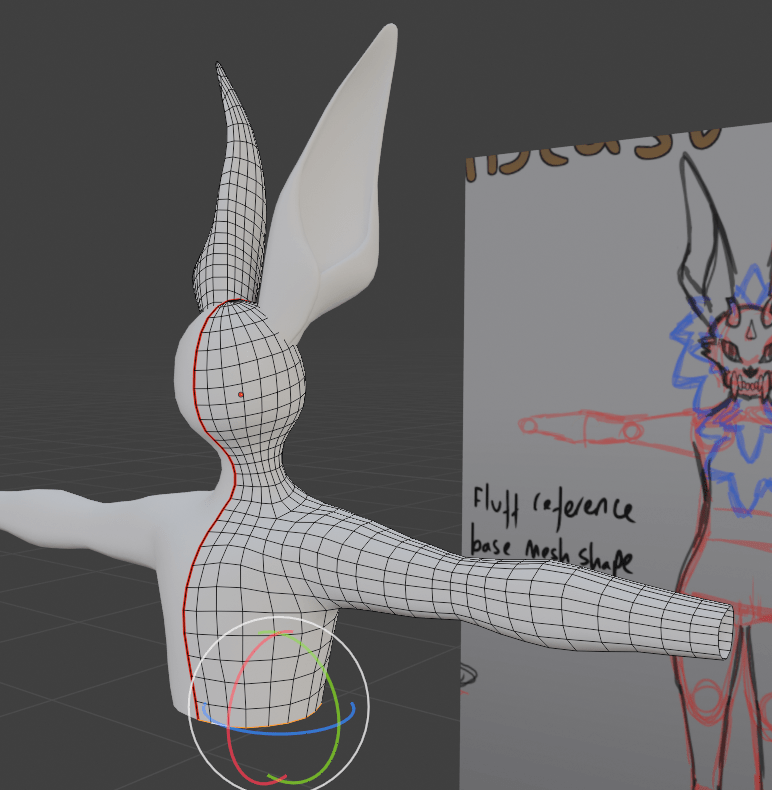
To start my project, I added a sphere to my scene. I got rid of a few edge loops to make it a little lower poly, but made sure there was still a like of polygons directly down the middle. I did this so that when I used the auto mirror blender plugin, it would be perfectly mirrored. I do this so that when I eventually get to the rigging stage, I can mirror my weights, and it just looks a lot neater over all. I also imported some planes, and edited the UVs to fit over my turnaround sheet that I had drawn previously a couple of weeks ago. I started extruding the shapes downwards to create a neck, chest and shoulder area, making sure to model from the flat X axis views, so I could see my references.


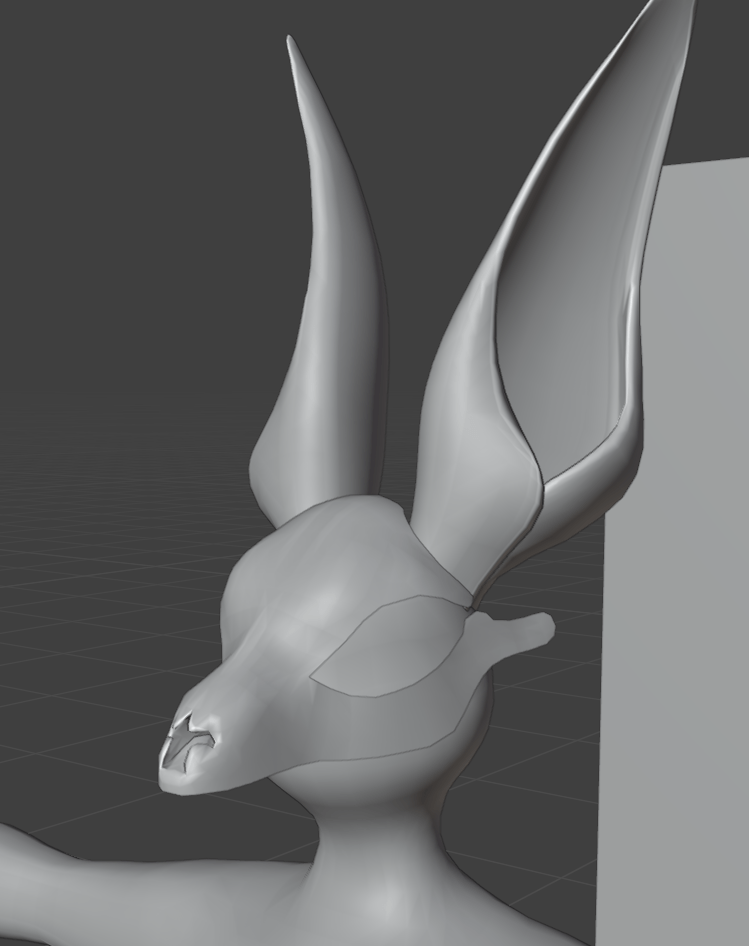
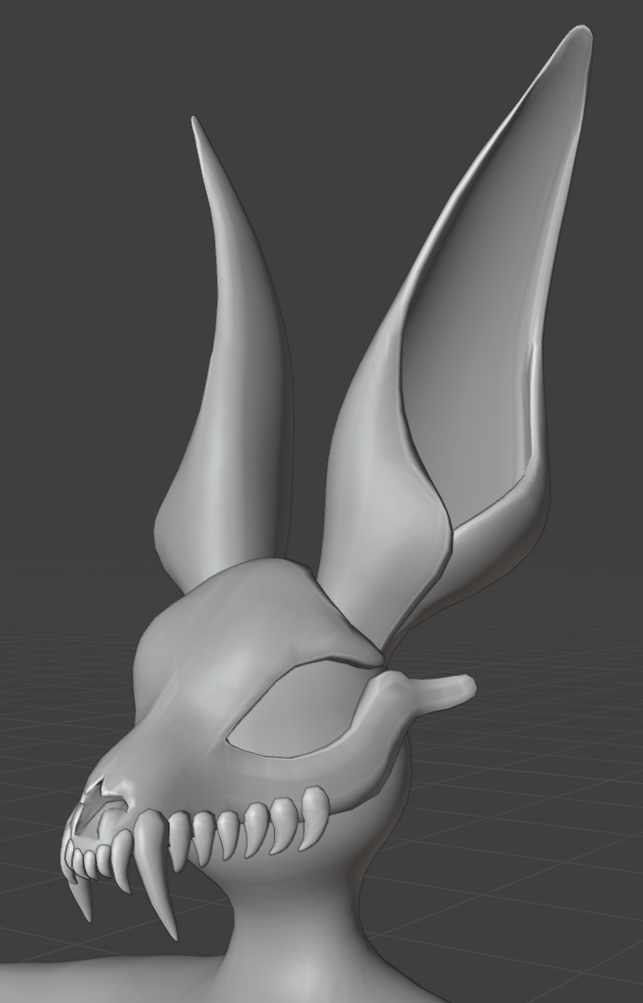
Next I decided to model the ear. I did this by adding a separate cube to the scene. I wanted to keep the ears and tail a separate mesh, so you can easily swap them out with different shaped ones. I roughly extruded it upwards and rougly constructed the shape. I then applied the subdivision surface modifier. Once I was happy with the rough shape, I applied the modifier and used the smoothing and grab sculpt tools to achieve a shape I was happy with. I will be using this method for the other ears, and the basic shape of the tails later on.


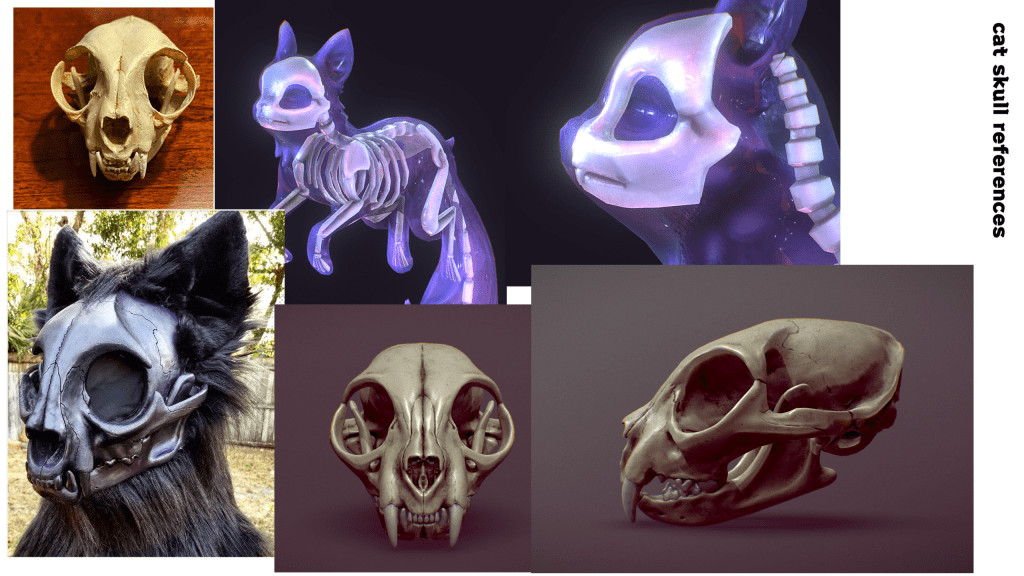
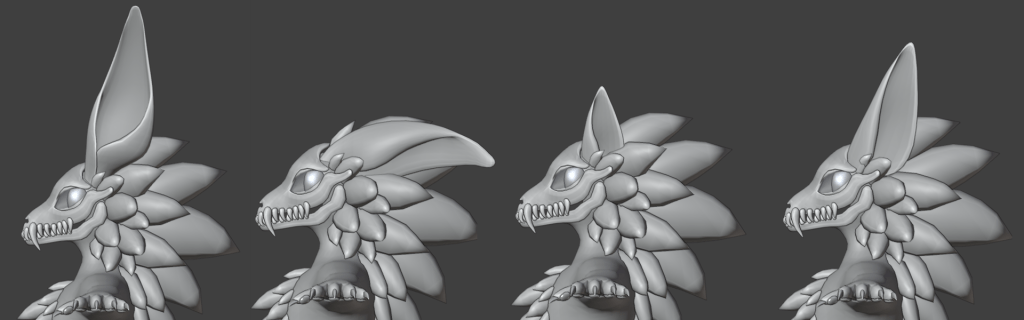
Next I decided to start working on the Skull. I actually started modelling from a single vertex, with a mirror modifier. I was using a lot of the more realistic skull pictures from the references I collected at the start of this project to get the nose shape correct.
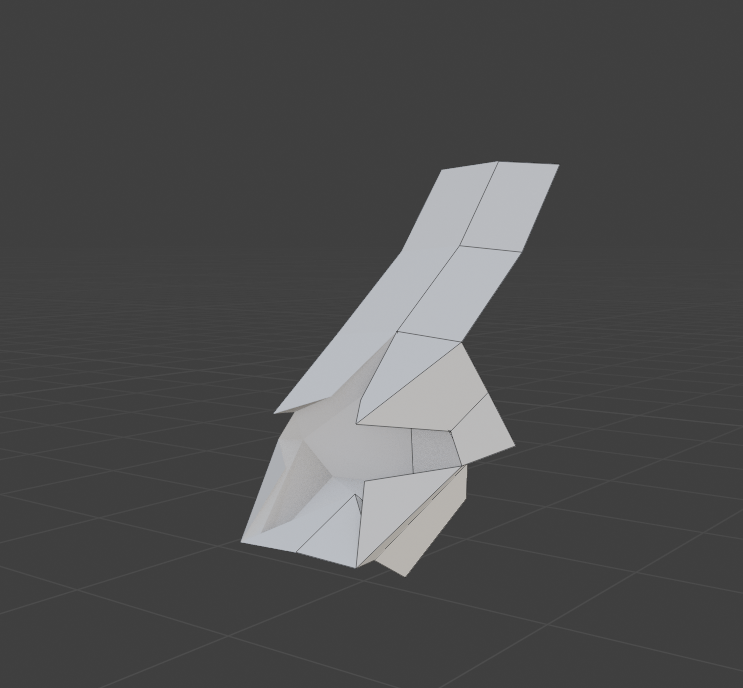
Once I was happy the bumps were in the right place, I also applied a subdivision to this model, and continued extruding it to form the rest of the face. I also drew out the rough eye socket holes starting from a singular vertex. I went up and down the head extruding and filling in gaps by using the fill function by pressing F. It kind of reminded me of how a lawnmower goes up and down a field until its done.

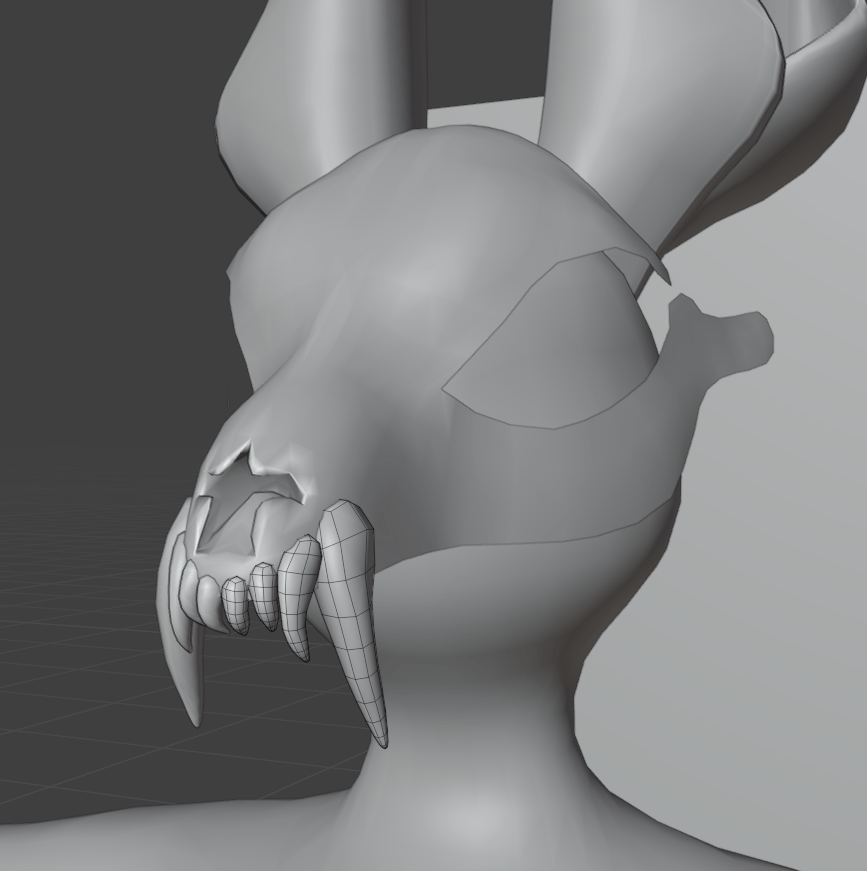
Here is what the topology looked like. I was trying to use quads as much as possible, to help if I ever needed to un-subdivide later on. Here is a really good video I found which taught me a lot about topology. It breaks down why quad topology is important for reasons such as, making clean and simple seams for unwrapping, and the ability to un-subdivide and subdivide in an industry standard way.

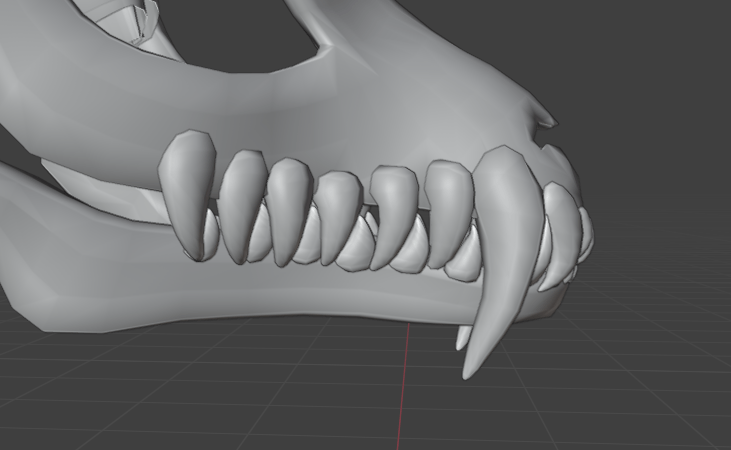
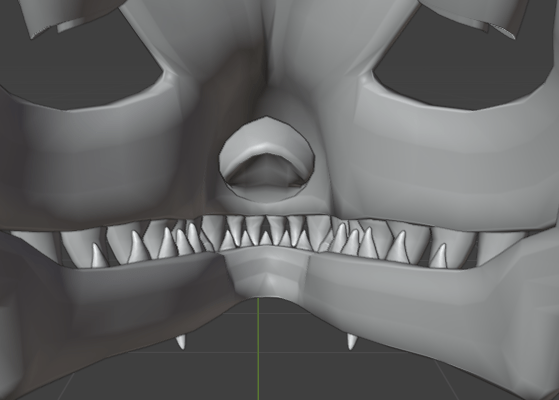
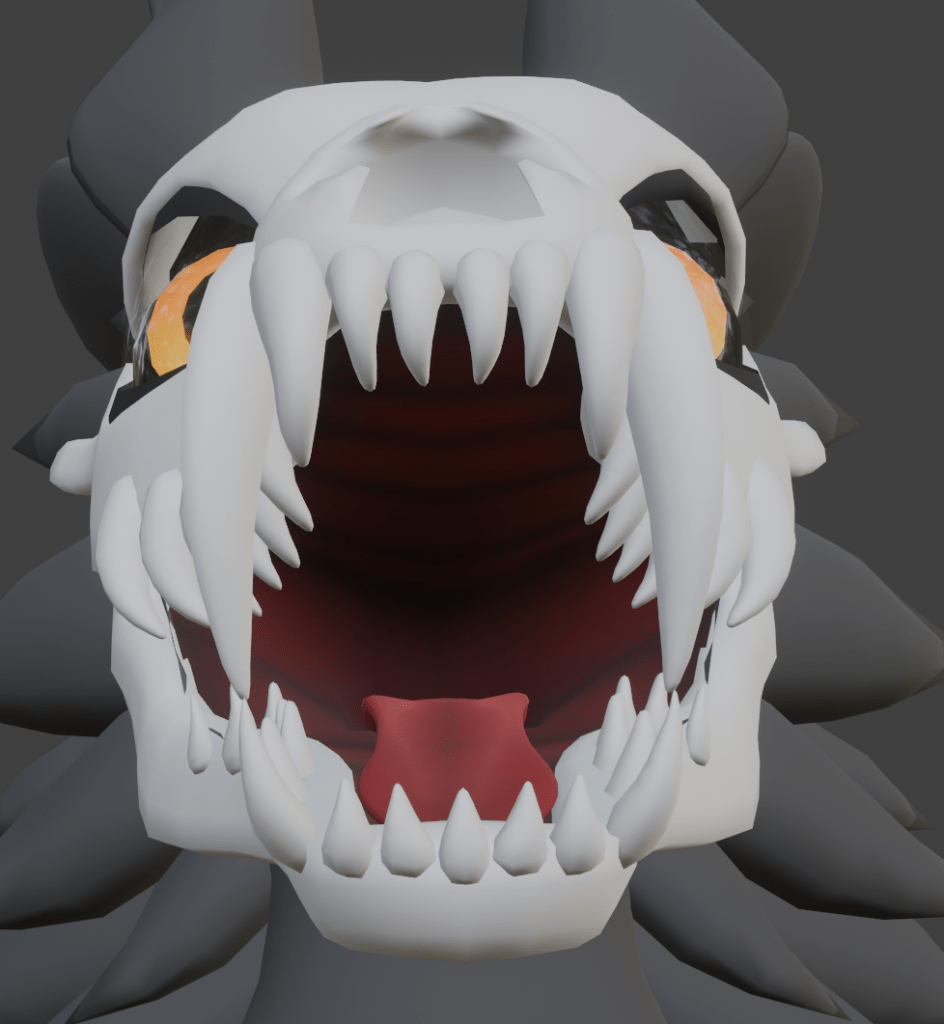
Next I started working on the teeth. These were relatively simple, and yet another case of me adding a cube, extruding to a rough shape, and subdividing. I thought by doing the top row of teeth, it would make modelling the lower jaw in the correct place a bit easier, instead of putting them too close together.

Next, I decided to make the top half of the skull a bit more 3D, instead of just a flat plane resembling a skull shape. I used the solidify plugin to achieve this effect. I also used the alt select to add an edge loop within the new inside face. I can use this to smooth the edges a bit, and as a great place to put the seams for the UV unwrapping.

I had to do a lot of adjusting around the nose on the inside layer of mesh, as the complex shape of it didn’t really agree with the solidify tool.
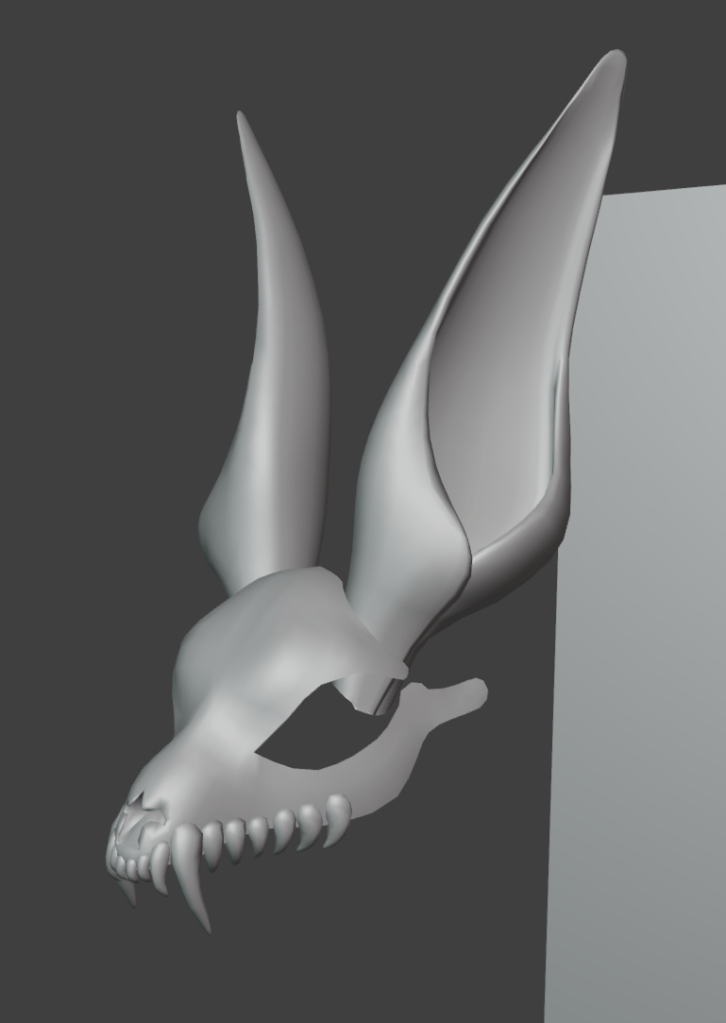
For the lower jaw, I used a similar method to get the rough shape. I started off with a singular vertex, filled it all in trying to keep quad topology, used the solidify modifier, and added an edge loop around the edges. This was a much faster process as the shape was not quite as complicated.
I copy and pasted the teeth, and adjusted the shape slightly. I started to place them on the lower jaw, inbetween the gaps on the teeth from the top of the skull

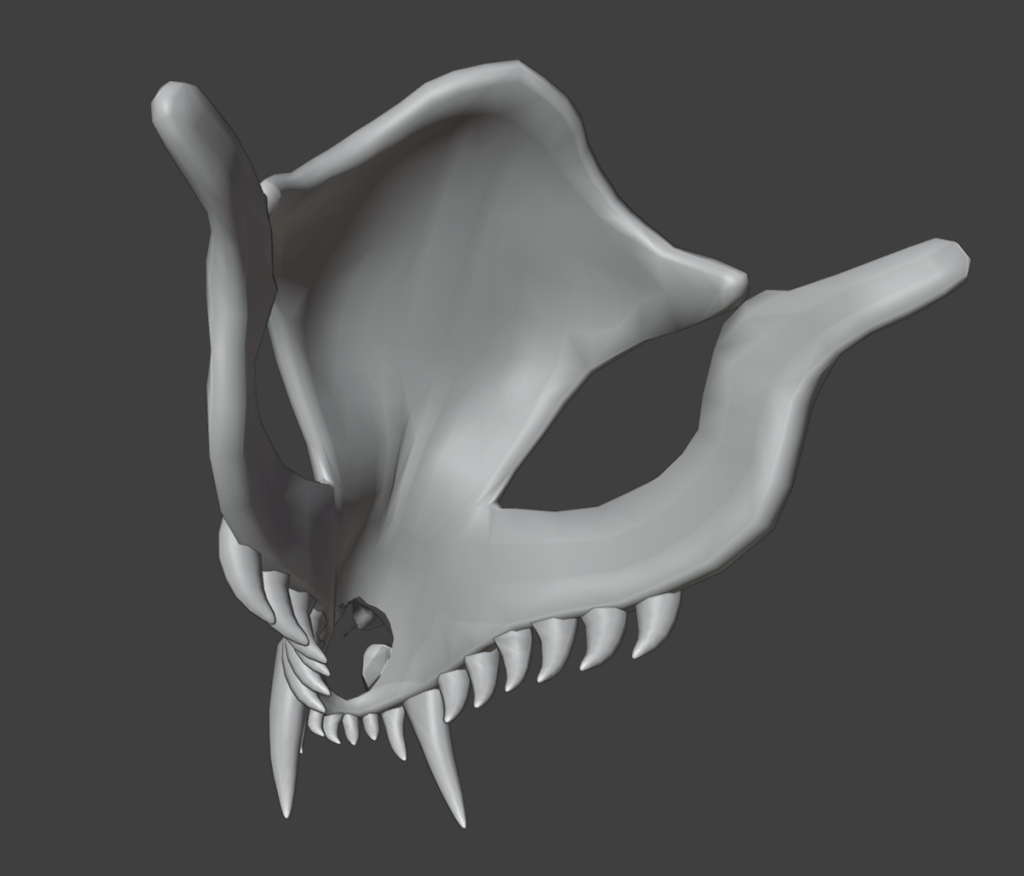
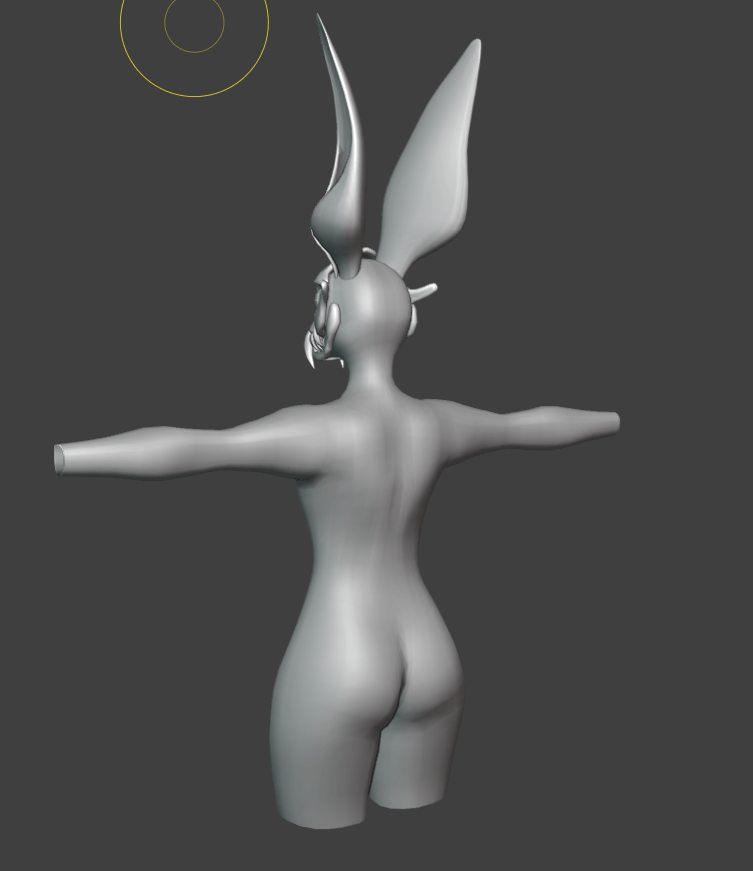
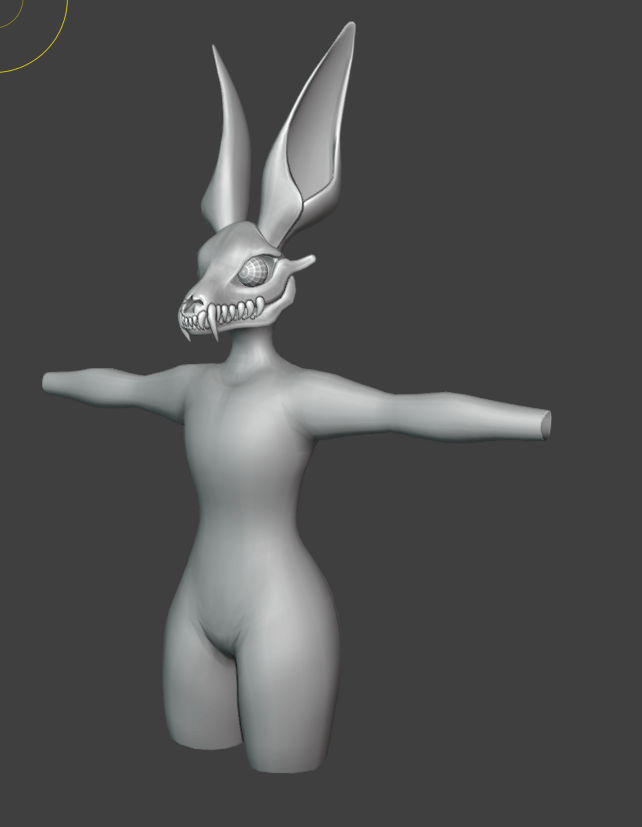
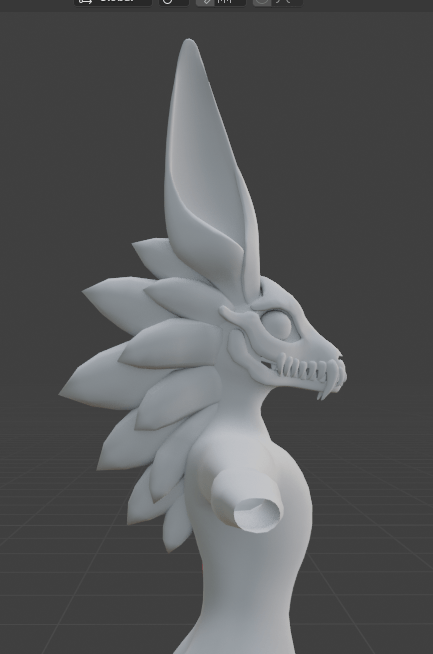
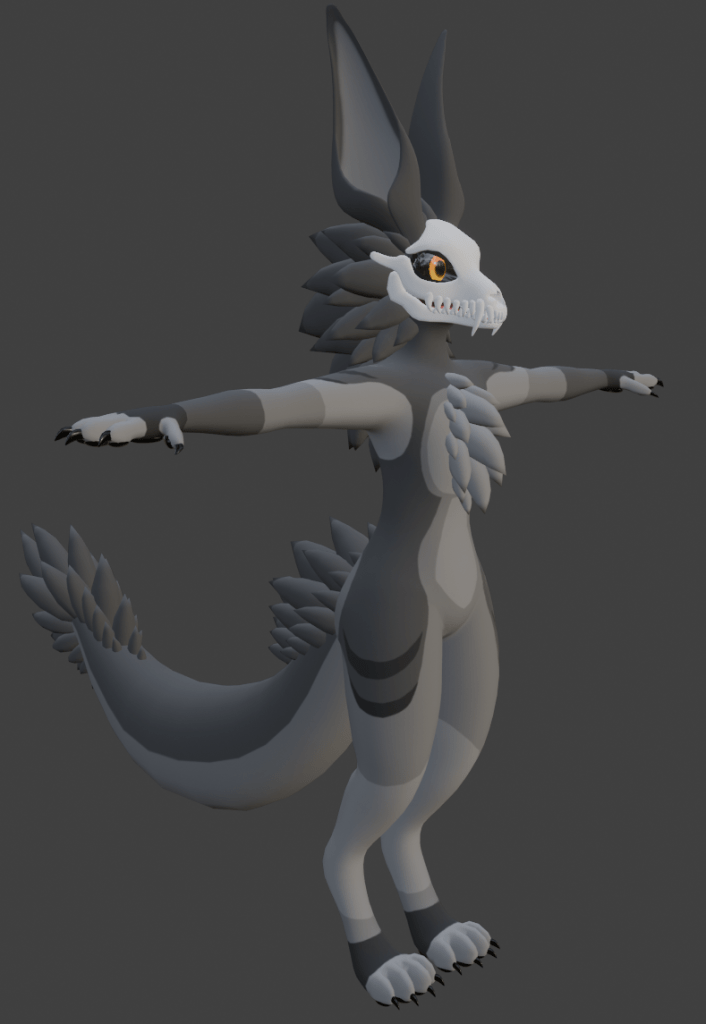
Overall, I thought this was a really good start, and I was super happy with the shape of the skull, and happy with the start of my characters body.
Week 6 – Continuing the project.
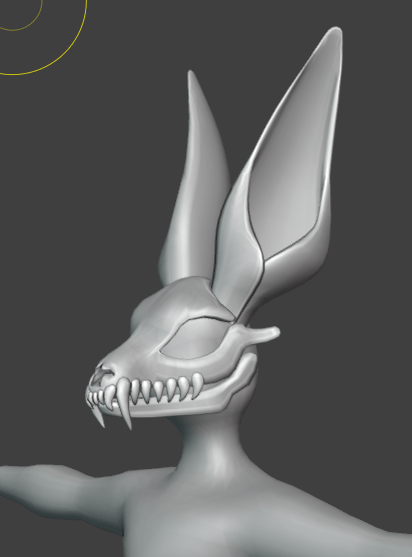
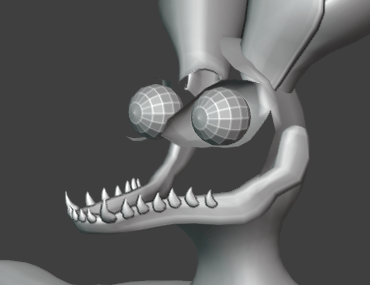
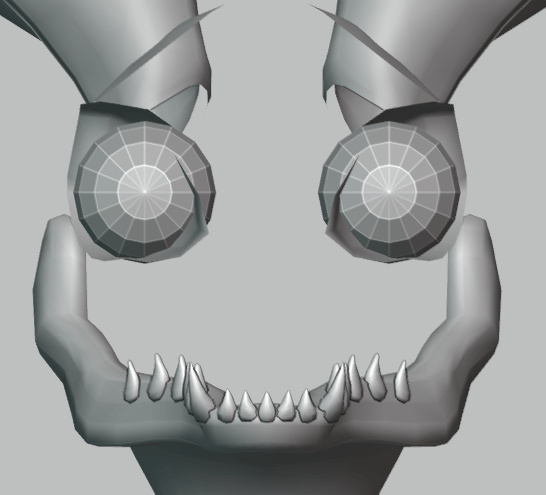
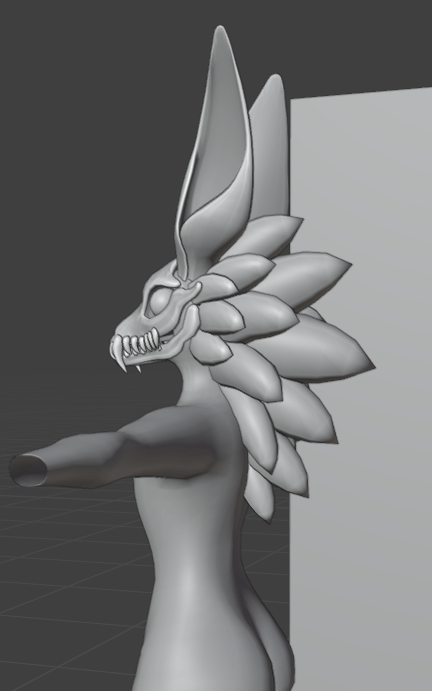
Now that the main skull has been modelled, I wanted to start blending it to fit onto the head section of the main body. First of all, I cut a large hole where the majority of the skull was going to sit, and extruded and sculpted a new area which goes from the neck to the front of the lower jaw.

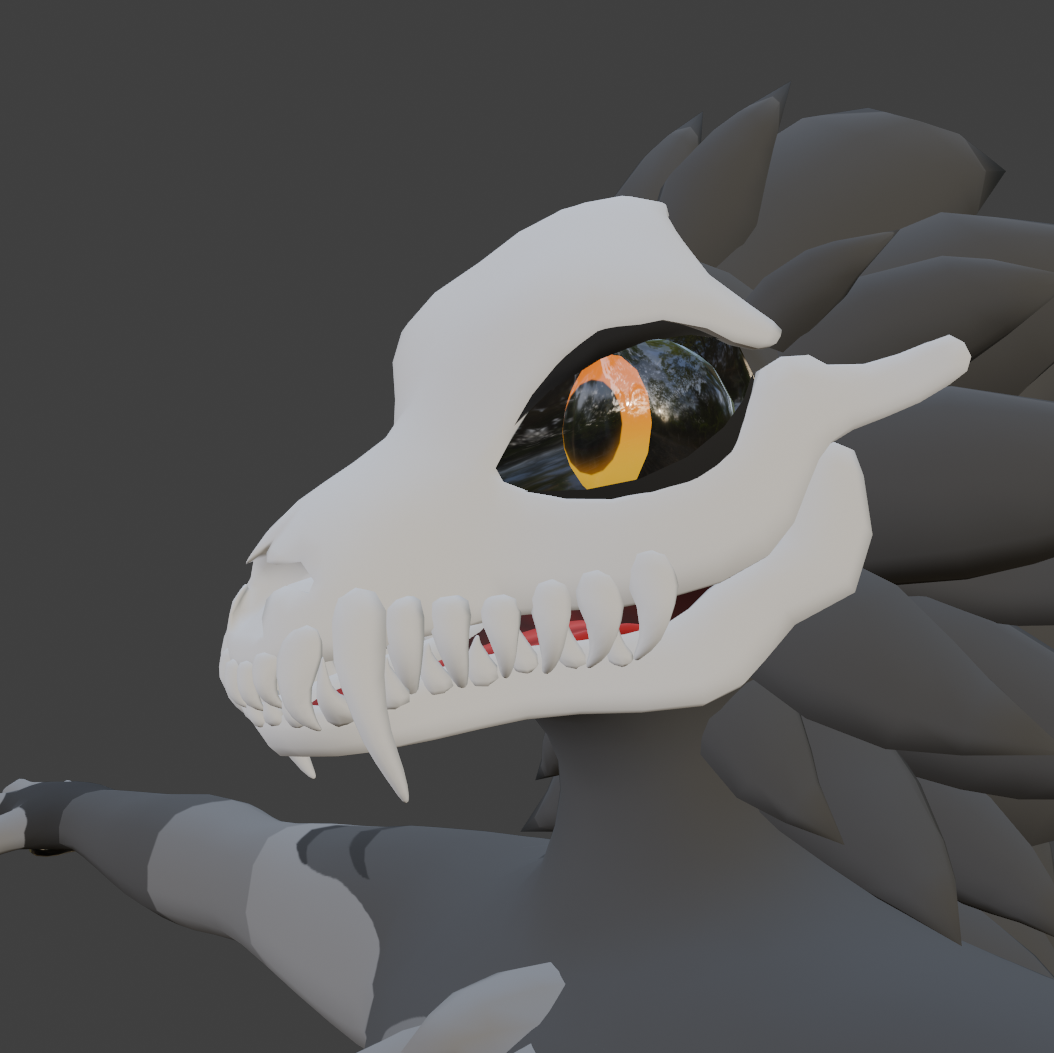
This blends the skull properly to the main body, without it looking like its just been stuck onto it. I also decided to do the eyes next. Due to the fact this avatar doesn’t really have a typically face, I would need to think outside of the box when it comes to eyes. I wanted them to look 3D, and they needed to have the ability to rotate using an eye bone. I created this plan to make sure that the eyes keep a full 3D effect, and doesn’t just look like a floating ball inside the socket.
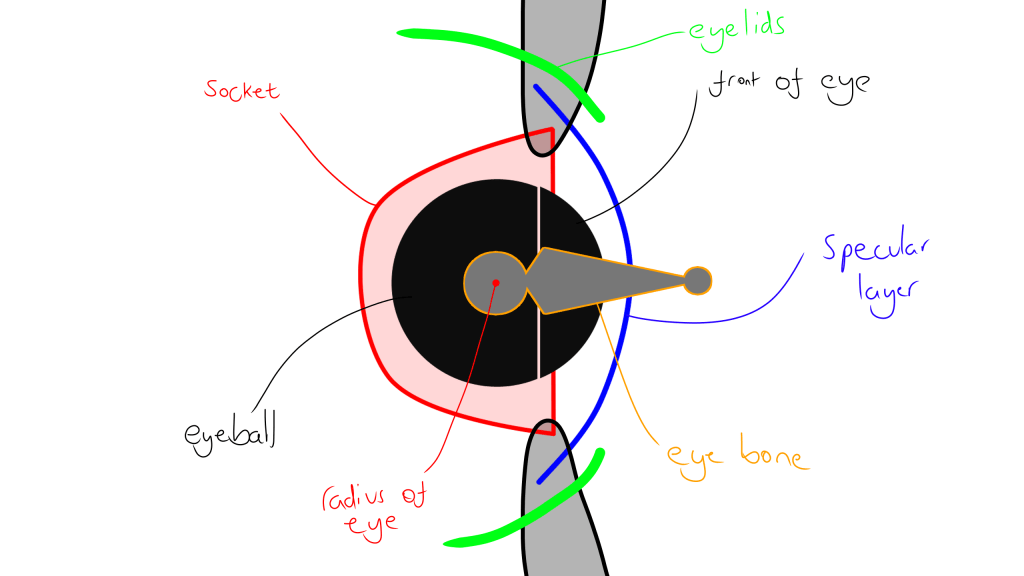
In these screenshot you can see the eye sockets, which are extruded from the main body, and the two sphere which will be out eyes. I need them to be spheres so I can rotate them from their radius with a bone, and they wont clip through the specular layer or eyelids. There is a lot of layers, and the spacing needs to be tight and accurate if its going to look good.
I also started working on the ‘Mouth bag’. These are typically small bags with inverted normals, which give a more 3D effect to the mouth of a character when it talks/opens its mouth. This avatar has a very large face, and you can see through the majority of the skull as it doesn’t have skin forming a mouth, So I needed to make something a bit more elaborate and detailed to keep that illusion, and to stop people seeing inside the face mesh.

Whilst it can be a bit hard to visualize from these pictures, and I don’t have any visemes set up yet to showcase it moving with the mouth, as You cannot apply modifiers with shape keys, so those will have to come once I have finished the modelling process.
Now that was finished, I started continuing to extrude the body. Once it was the right length, I started filling in and attaching the polygons around the crotch area. I made sure to leave two hole for the thighs to come from.
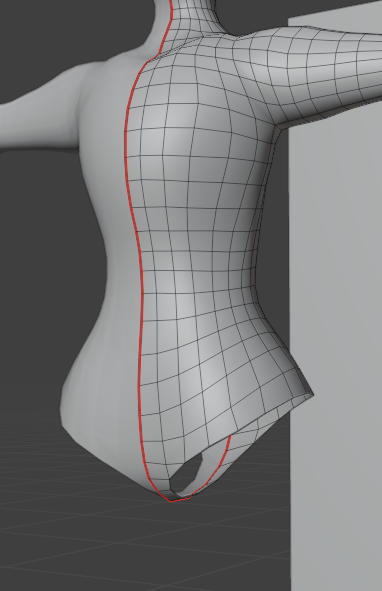
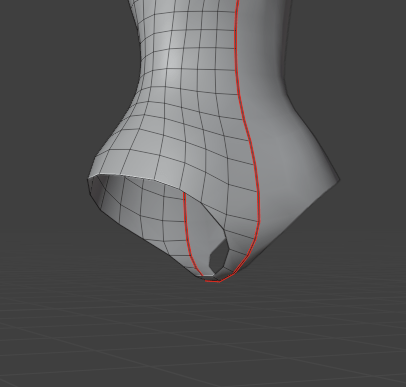
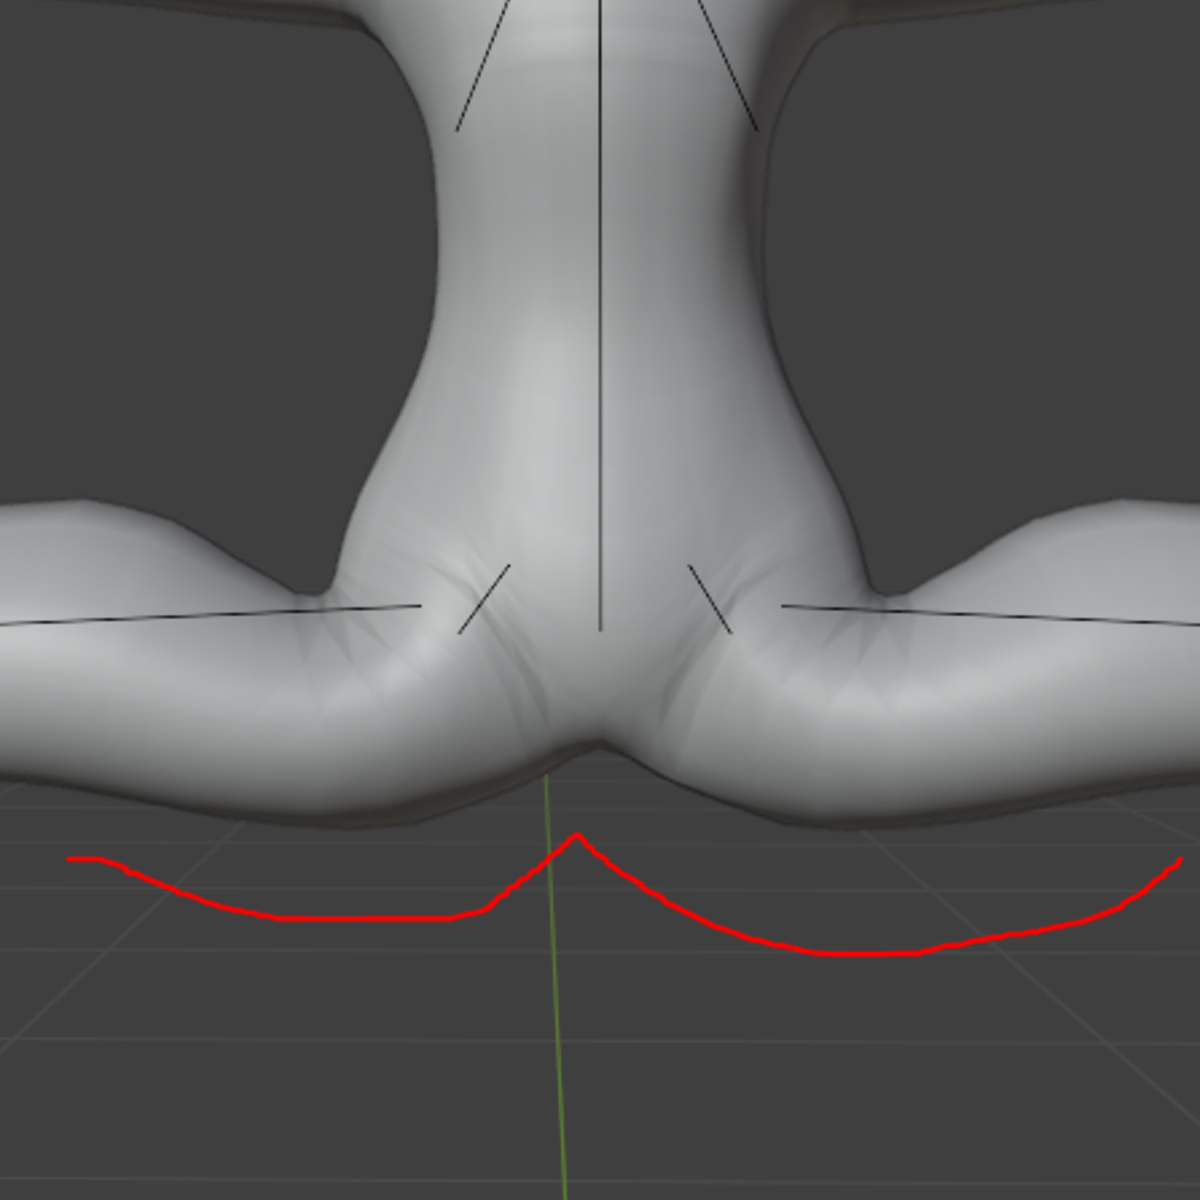
At this point, I was starting to touch up the rough shape of the chest with the sculpting tools, defining areas around the collarbones, smoothing out more jagged parts of the extrusions, and edge loop cutting areas which are going to be deforming a lot, such as elbows, the crotch area, and around the shoulders and armpits. I also used sculpting to define the back of the thighs, shoulder blades, and the buttocks. The buttocks are actually quite an important thing to define on a base that will be using large tails, you need to have a smooth shape that makes sense, otherwise it will look like the tail is just superglued on. You need to have a smooth curve, as shown in my drawing, and the back of the thighs kind of add to that curve.

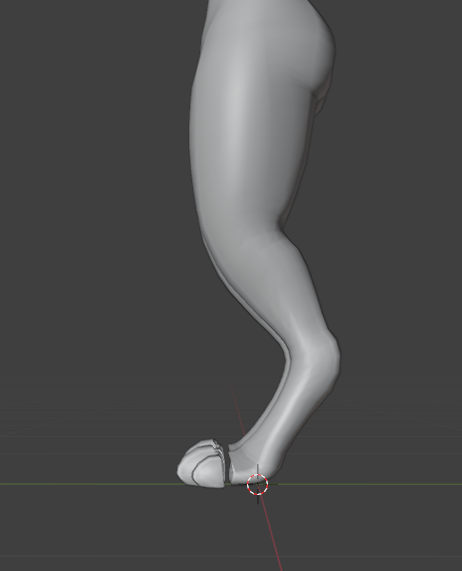
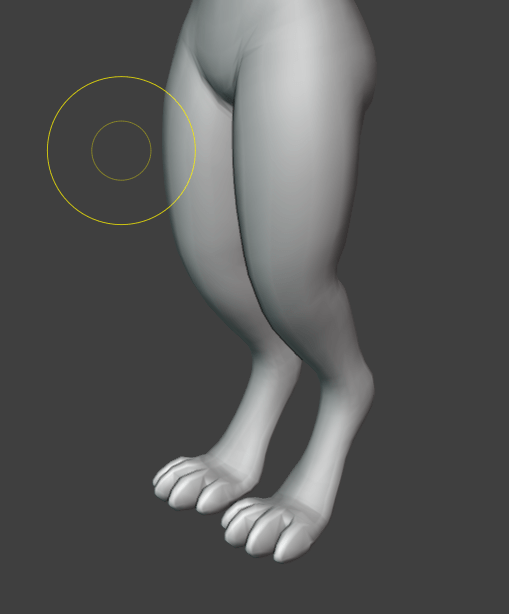
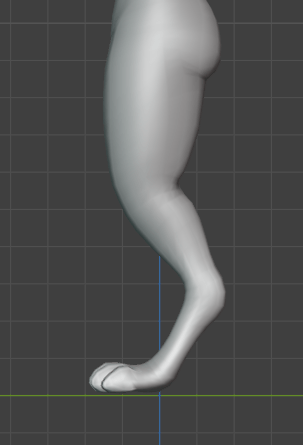
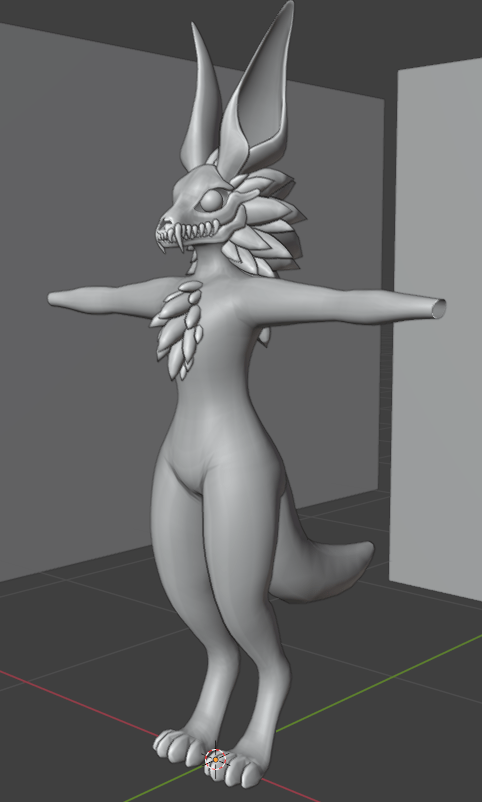
Once I was happy with the shape of the body, I continued extruding the rough shape of the legs
Once I had finished the rough shape, I added appropriate edge loops around the knee and ankle areas, and smoothed out the mesh using sculpting tools.
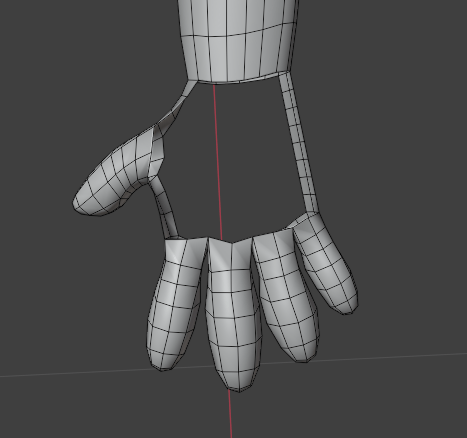
Overall, I was pretty happy with the shape of the legs. I think I had captured the digitigrade effect really well. Next I modelled a rough toe shape, and copy and pasted it four times.
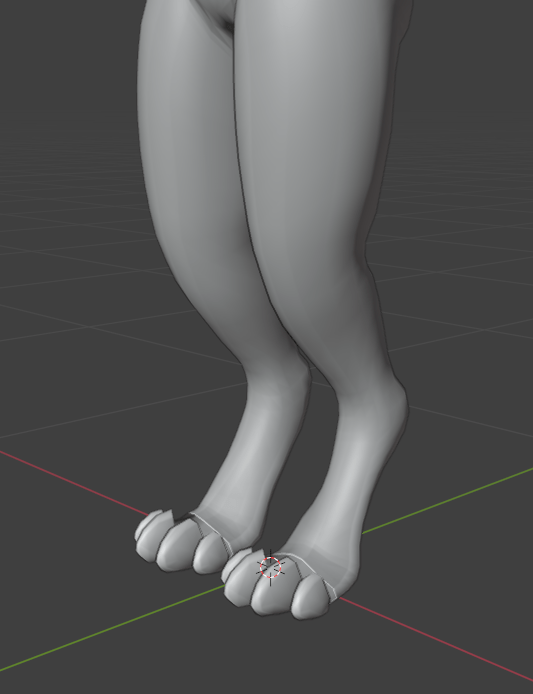
I simply just filled in the gap by filling in vertices with edges, and then filling in the polygons one by one. I smoothed it out with the sculpting tools, and it looked relatively seamless.
I also just wanted to point out how incredibly useful drawing out these turnaround sheets are. I know I mentioned the importance earlier above, however it made the proportions, and getting everything (especially the more complex areas like armpits, hips, and other joint areas) to just look right so much easier and faster.
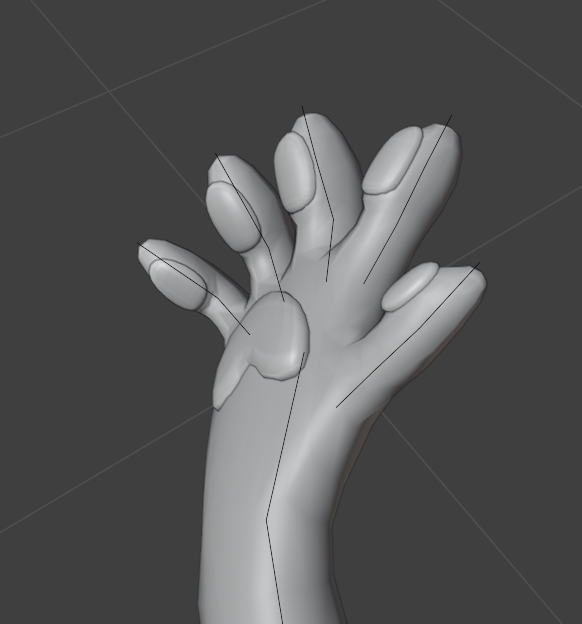
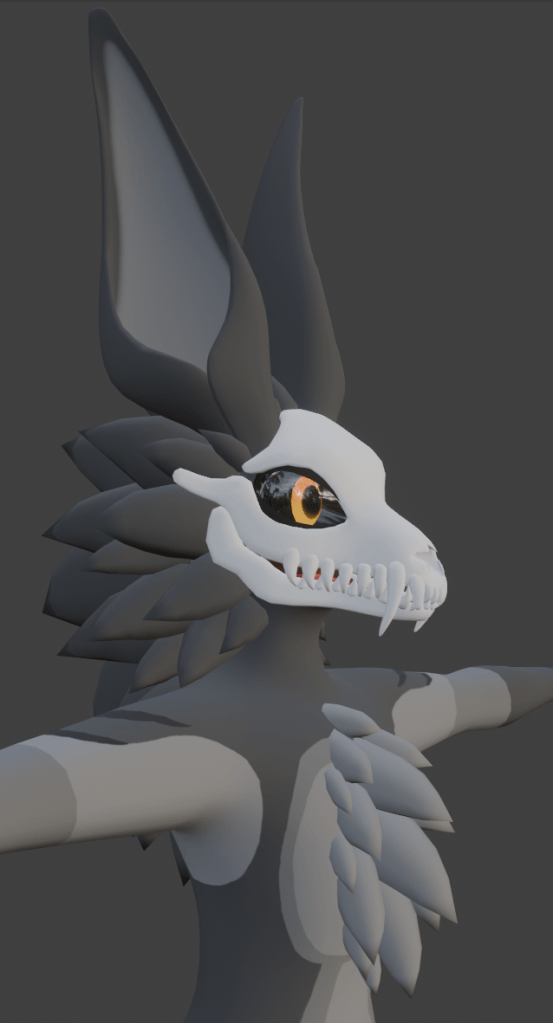
Next, I started modelling the headfluff. I probably should have done the hands in hindsight first, but I did want a little break from doing individual toes/fingers, and filling in the gaps. I was kind of dreading the hands, as I was intending to rig each and every finger individually, so I would need to be a lot more careful about the topology and think about deformations. I didn’t have to put as much thought into it with the toes, as I only intend to rig the toes with one singular bone.
I used a similar method for modelling the fluff as I did for the teeth, I simply added a cube, extruded about 3 times, and added a subdivision modifier. This created a nice rough shape.

I copy and pasted the same fluff bits, and created a pattern for the chest fluff as well.
Before I modelled the fingers and completed the hand, I had a look at a the Rexouium avatar base, which I did a case study on earlier. I had a look at the topology on the hands of this base, so I could get a good example of what I may need to do to model my own.
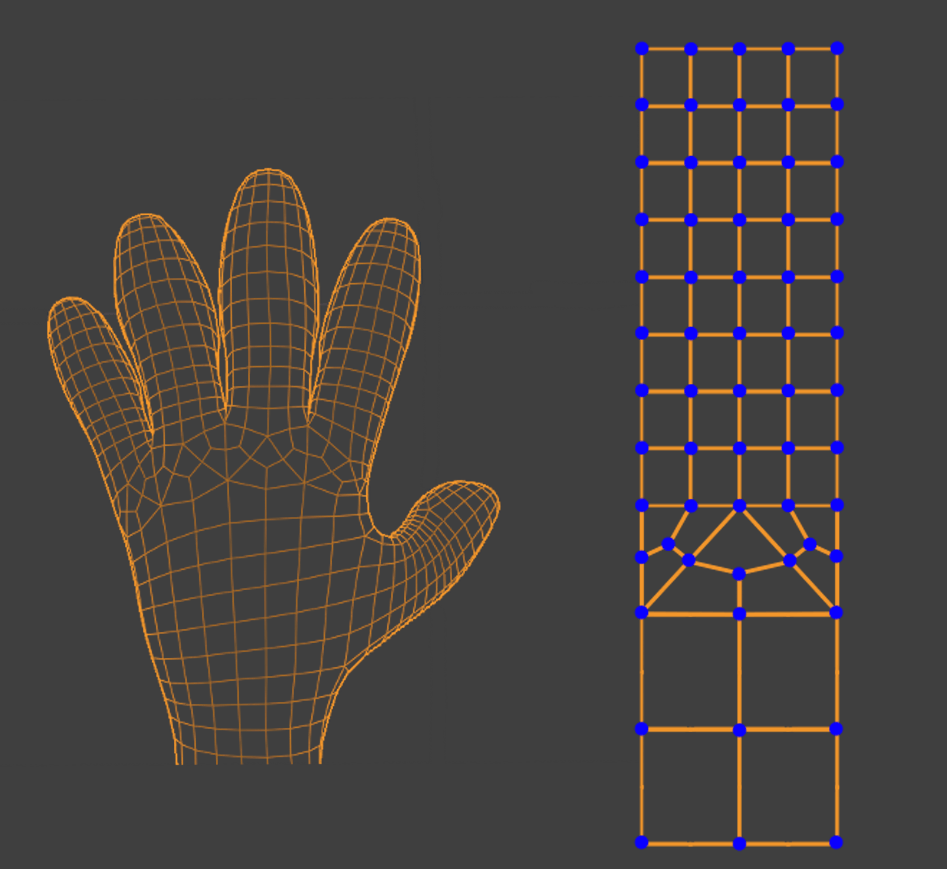
I noticed that if you were to subdivide the main arms topology, and straighten everything out, it would all be in a perfect straight line. by having the right amount of edges around the arm, you can completely avoid tris. The rexouiums hand also uses a fancy method of splitting its two edge loops into four, and it does this whilst maintaining quad topology. I did a little drawing of how this transition was made, just in case I wanted to do a similar strategy, and add more detail to the fingers.
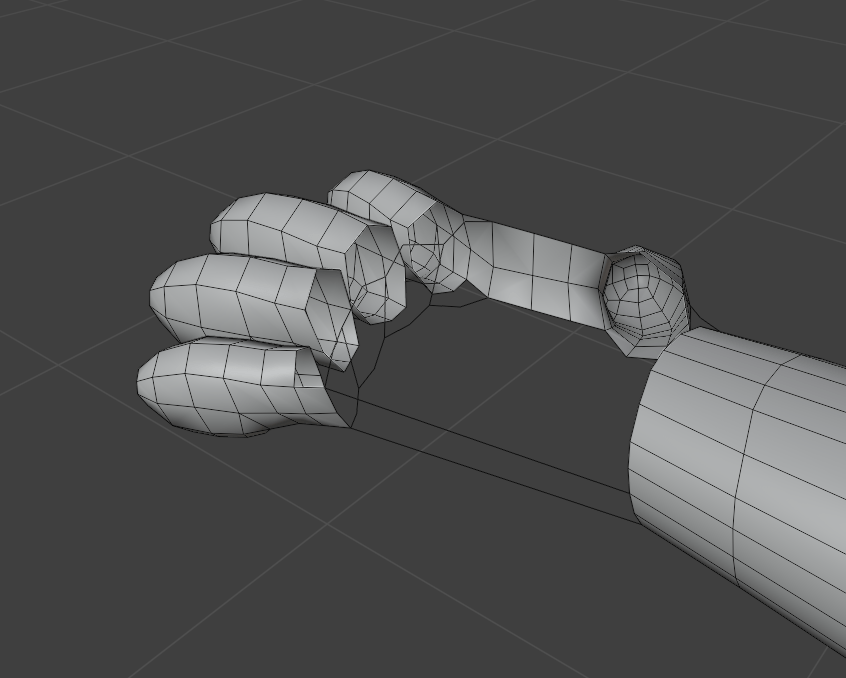

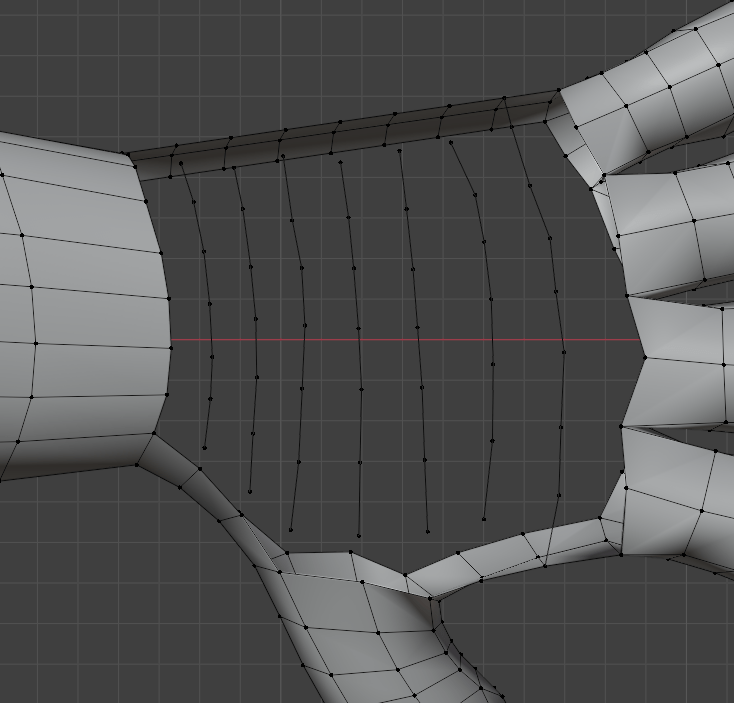
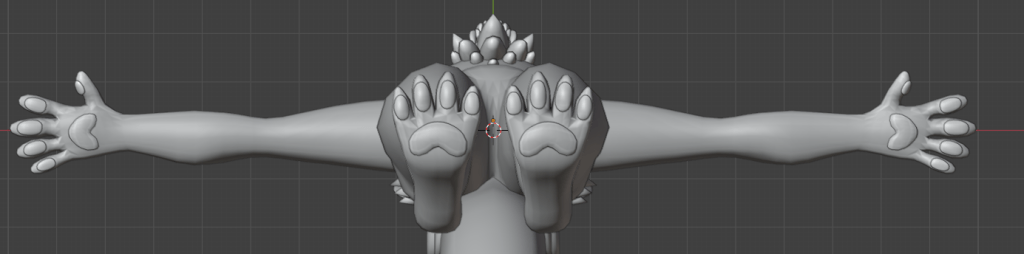
In the end, I didnt need to convert 4 length topology into 2 length, I just deleted a few edge loops to give me the ability to line up the fingers perfectly. I also adjusted the topology to shape around where the paw pads would be roughly. This would make transferring weights onto the paw pads super easy and avoid inconsistent weighting between the two separate meshes, and it should help guide the lighting around the pads a bit better.
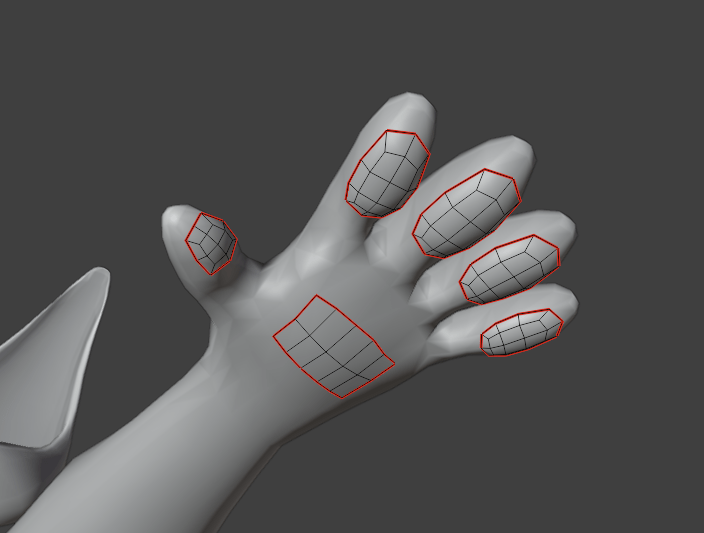

To model the paw pads, I duplicated the bits of mesh I had edited on the hand topology, subdivided them, and used the sculpt tools to adjust the shame and smooth them out a bit. I also made sure the first edge loop was clipping inside the hand, so they didn’t look like they were floating. I did a similar process to model the paw pads on the feet.

Next I decided to do the eyelids. I actually modelled the closed state first, and I just did this by extruding a plane roughly, and smoothing the mesh
Shapekey sculpting
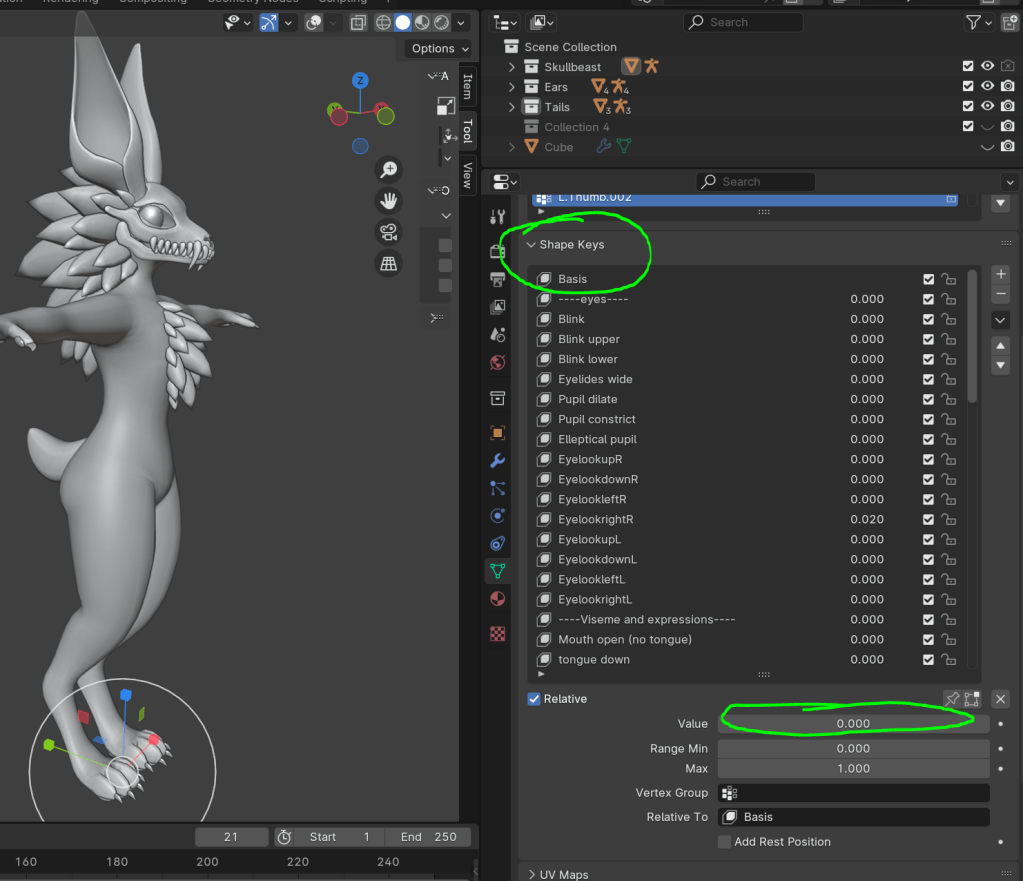
I used the same feature for the blinking, however now the majority of the modelling is done now, so I can start doing the rest of them. This includes things likes the oculus viseme index, facial expressions, body shape customization ect. Shapekeys are actually very easy to make, you just press the little add icon to get yourself a basis, and then start adding all the options you are going to have. To sculpt what the shapekey is going to do, change the value to one, and then make all the changes to the mesh that u want. By moving that slider up and down, it will slowly shift between the basis shape, and the new edited shape.
For example, here are the female shapekeys that I sculpted. adds a little bit more definition to the hips, and forms breasts. You can see how this works in the gif down below. This is how people will change the look of their character, to suit how they want to be perceived!

I also did the visemes, using the oculus viseme index. However I mainly just used this to help with positioning on the tongue. Because this character has bones for a face, its doesn’t deform the same way a typical mouth would, due to the lack of skin.
I also added some extra shapekeys which involved the mouth opening, and tongue moving down. These wouldn’t be used for speaking, and more for creating facial expressions in the unity package.


Oculus. Viseme Reference. [Online]. Oculus developer. Last Updated: (unknown) Available at: https://developer.oculus.com/documentation/unity/audio-ovrlipsync-viseme-reference/?locale=en_GB [Accessed 1 April 2024].
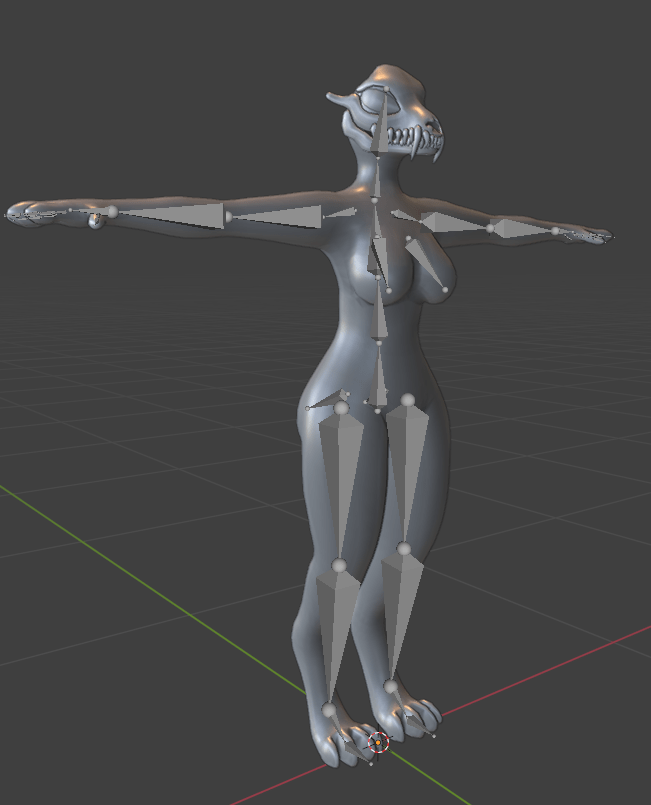
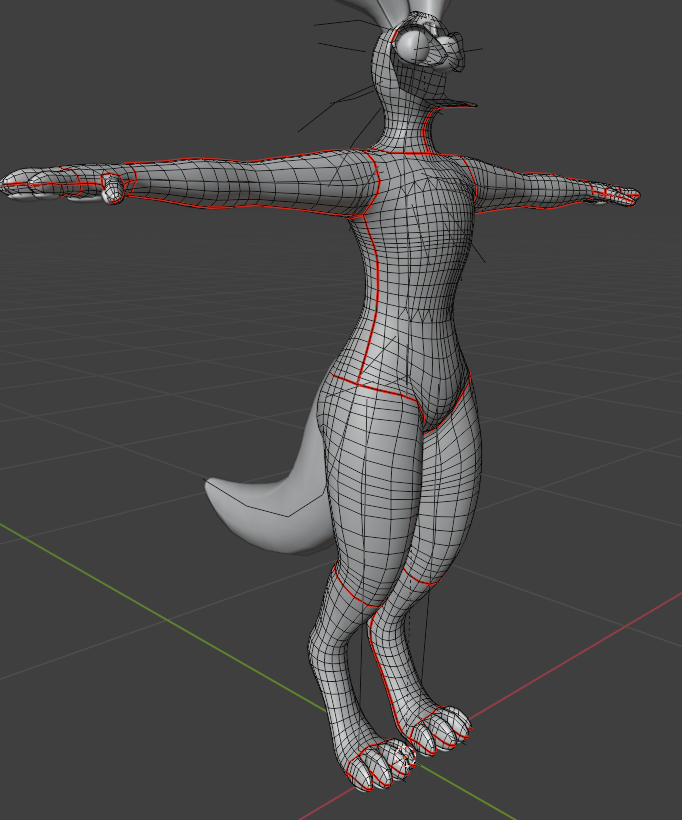
Now the modelling and shapekeys are done it was time to do the rig, first of all, I need to rig the base body, without any of the fluff and paws pads. I can transfer the weights to them after weight painting the base mesh.
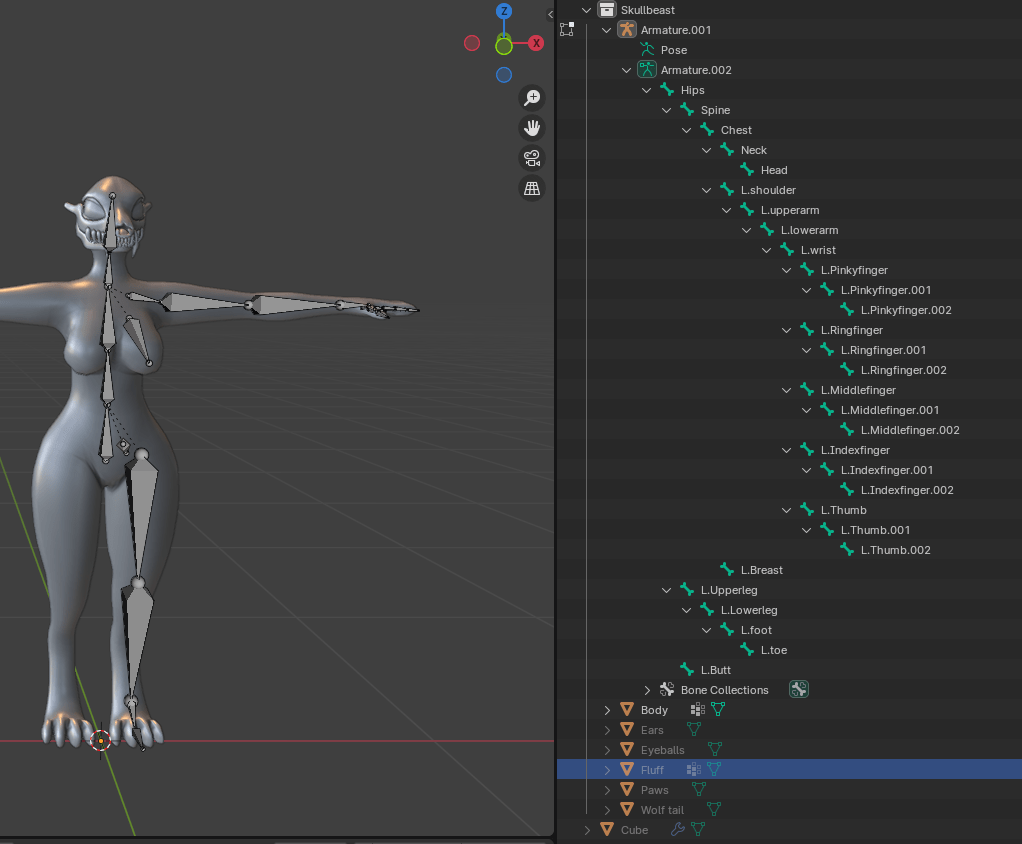
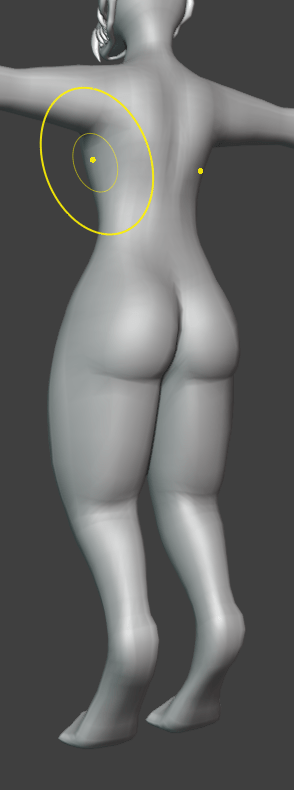
You can see I used the symmetry feature to mirror all the bones which aren’t directly in the middle. I also made sure to keep the names of the bones standard, so that it would save me time configuring the rig in unity. I also rigged the character with the female shapekeys enabled, so I could apply the correct weights to the breast bones. This would allow for more realistic physics within unity, using dynamic bones. I will be using the same property for the ears, tail and fluff.
Automatic weight paint errors and the (painful) solution:
Typically at this stage you would apply automatic weights, and start smoothing and adjusting it from there, however this is where I encountered my first problem. No matter what I did, recalculating normals, clearing normal data, my automatic weights were just not working, and every time I tried to apply them, they were basically unusable as a starting position.
So my solution was to weight paint some other way. I could use mixamo instead as a starting point, but I decided against this as this would mean I have a new rig to deal with. The mixamo rig wouldn’t create things like breast bones. So I decided to rig the entire thing myself, so I parented the mesh to the armature with zero weights and started weight painting every bone by hand. I also split my model in half again using the auto mirror plugin. This would mean I only have to weight the left half, and the weights would be symmetrical on the right half of the character when I re apply the mirror modifier. I also like to use the gradient tool when weight painting, to get the rough outline, which doesn’t support symmetry painting like the typical weight brush does, so this is a good way around that. (I also made sure to check auto normalize weights, so that I didn’t encounter any shrinking issues with mesh that had *too much* weight. without auto normalize, technically you can have multiple bones with maximum weight strength on a mesh, which just causes tons of problems, and a poor looking rig)
Another thing I also need to consider is the fact I have turned the mesh into a mirrored object again, and I have already made the shapekeys. Blender will not allow you to apply the modifier if you have shapekeys on your mesh, which means I had to create a duplicate of the body mesh with zero shapekeys to do all of the weight painting on. Once I’m happy with the rig, I can transfer the weights of the rigged mesh with no shapekeys, to the unrigged mesh with shapekeys. This is a really good video explaining how transferring weights works. Its typically used as a quick way to rig clothing.
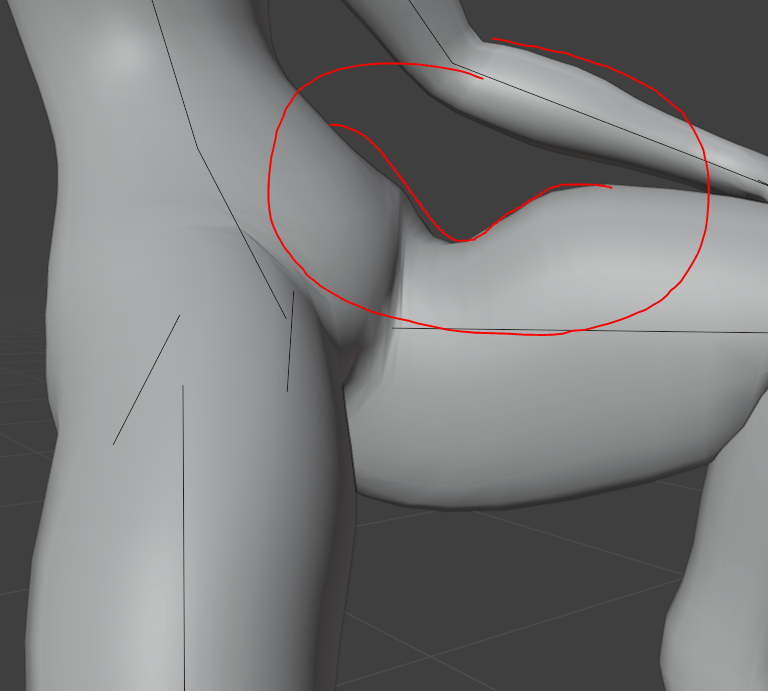
This was good, however I still wasnt quite happy with it. Hips naturally are a very hard part of a a character to rig, and when creating an asset which is going to be used primarily for Social VR, which often uses the android platform on unity, it means we cant do constraint rigging. Typically you will rig additional hip bones, which have rotational constraints to the upper leg bone. This creates a smooth curve between the hips and thighs. However I cant really do that, so there is only so good my rig can get. However, I still felt like I could improve some of the dips and bumps I was getting.

Once I was happy with the weights, I transferred the weights onto the shapekey mesh for the final time, and added the skull back onto the face. The skull was very easy to weight paint, as 100 percent of it is weighted to the head bone.
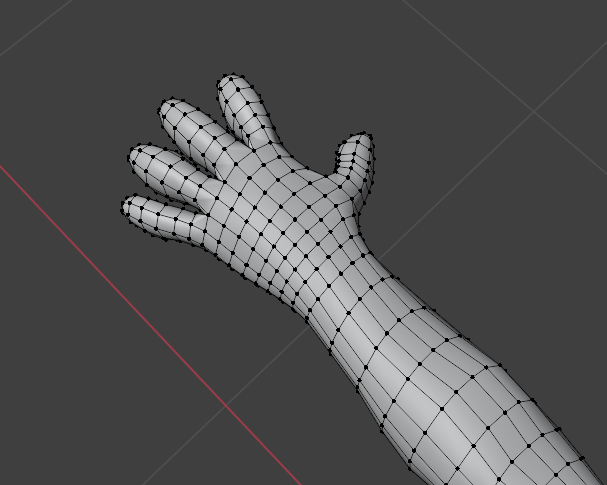
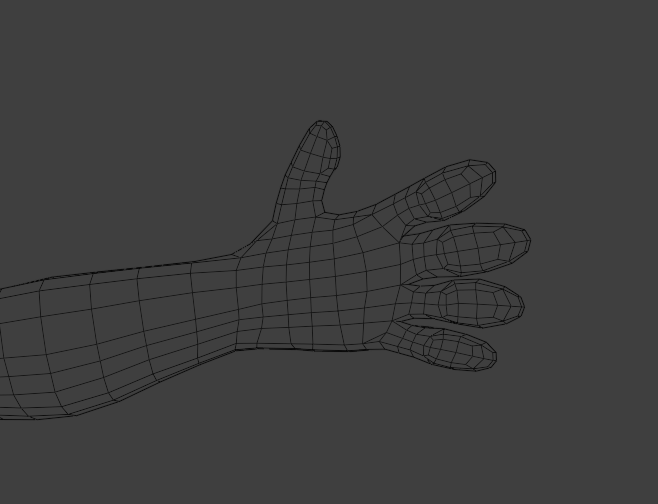
Here are some videos showcasing the weights, and a couple of poses I did just to test out how natural it looks.


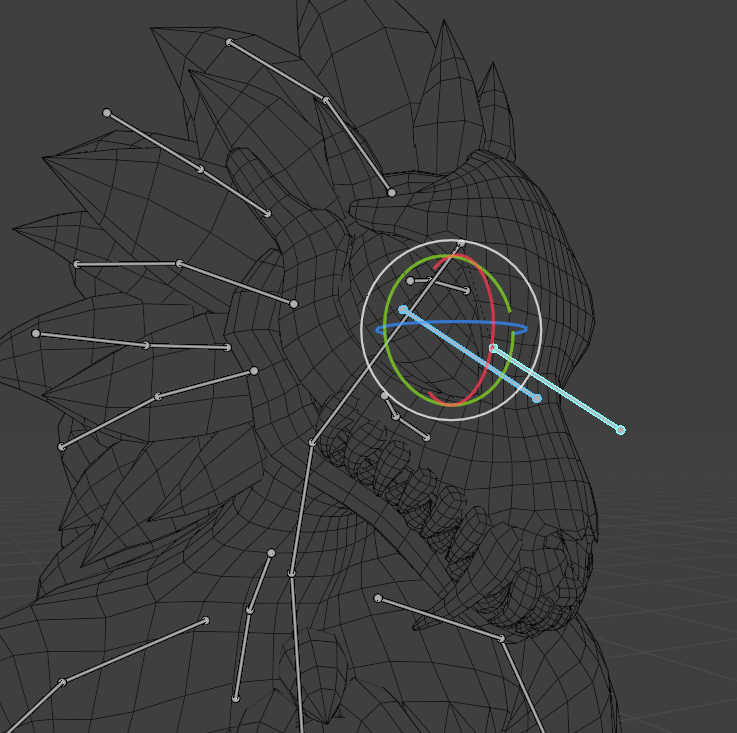
Next I had to weight paint the fluff and the eyes. The fluff wasn’t too bad, I just created some rough bones which were parented to the head and neck, and used the radial tool to assign rough weights. These bones dont have full weights on the fluff, this just makes everything blender a bit smoother with the head rotations, but still allows for dynamic movement.
The left and right eye bones are extruded from the center of the spherical eyeballs. This means they rotate pretty seamlessly. Rigging the eyes like this allows for eye movements, and lets users use eye tracking software if they have that available.

Overall I am happy with this rig, however in hindsight, I wish I had done the shape keys after the rigging. This would have just made things so much easier instead of having to make duplicate meshes and transferring weights every time I wanted to test it. (modifiers like the mirror modifier cant be applied when you have shapekeys on a mesh)
To finish this week off I also modelled some claws. You can retract them using shapekeys. I just weighted them to the final bone in the fingertips.
Week 7 – Continuing the project. (UV unwrapping, texturing and extra bits)
Before I started UV unwrapping, I decided to model some additional tail options, and alternate ear options. In total I have 4 different styles of ear now. This allows people to style their character a bit more. The floppy one gives more mischievous goblin vibes, and the two different sized canid ears give people a bit more of a neutral option if the default pointy ears are too much.
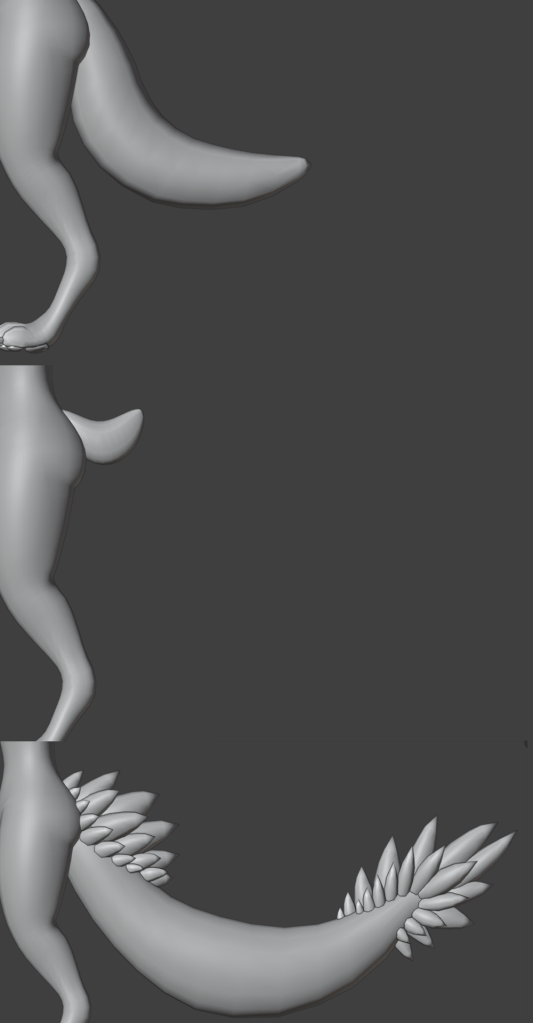
I did a standard wolf tail shape for the default tail. This is a good neutral starting point. I also did a little nub tail, as I thought this avatar base would look super cool with some antlers and other deer features. Finally I did an over the top tail, with lots of fluff. This is for people who want to make a statement, and be more beast/dragon like.
All these tails and ears are on separate meshes and armatures, so that I can set them up as pre made prefabs in unity. The users will just be able to drag and drop which style they want.
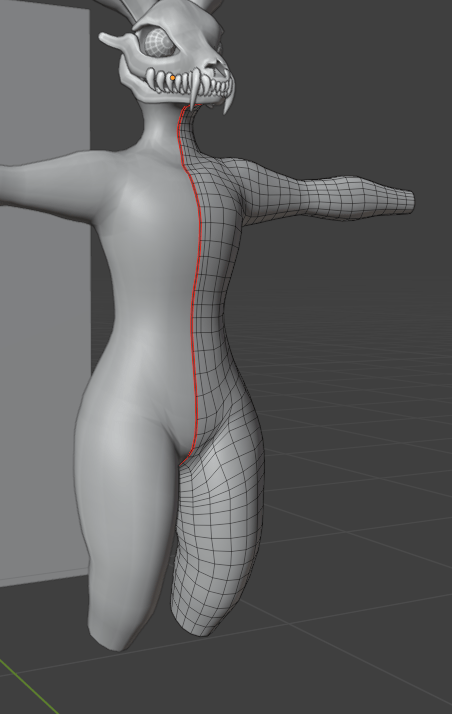
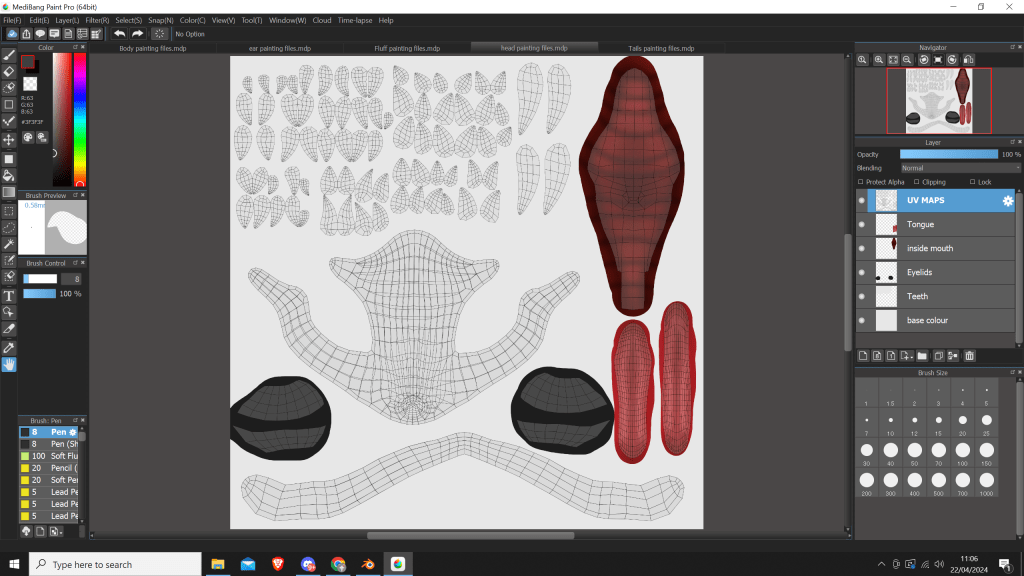
The easy option to UV unwrap would be to press smart UV unwrap, however this isnt a good idea for my project. I need to keep things well sectioned off and organized, incase someone wants to paint textures in 2D programs. I use the ALT select function in blender to select edges quickly, and make seams. These allow me to unwrap the body in segments.

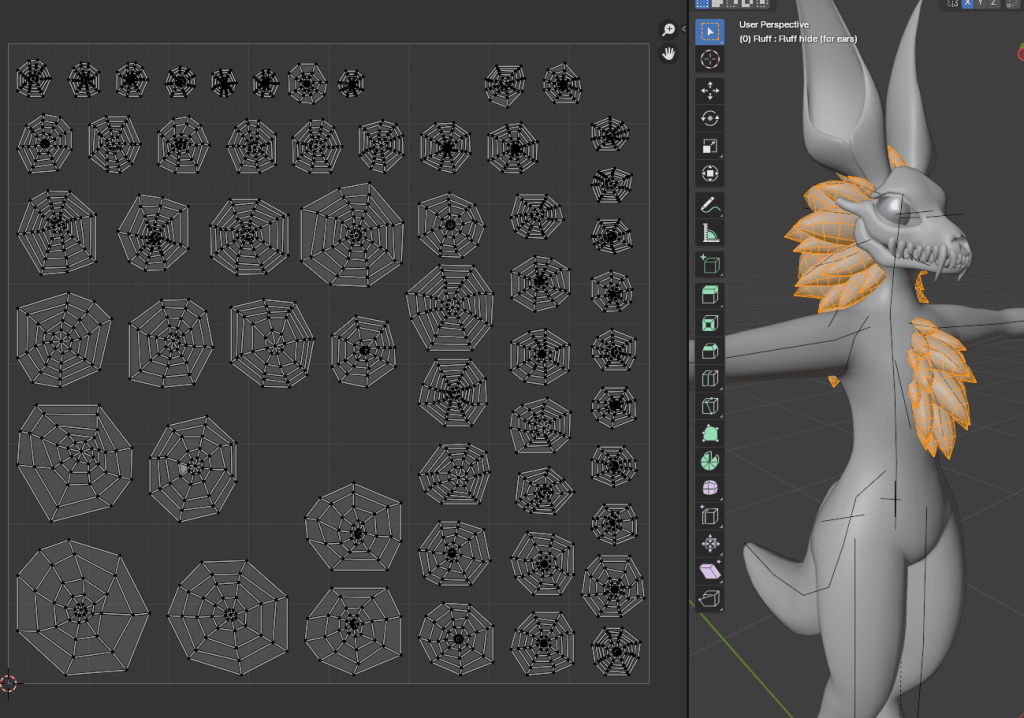
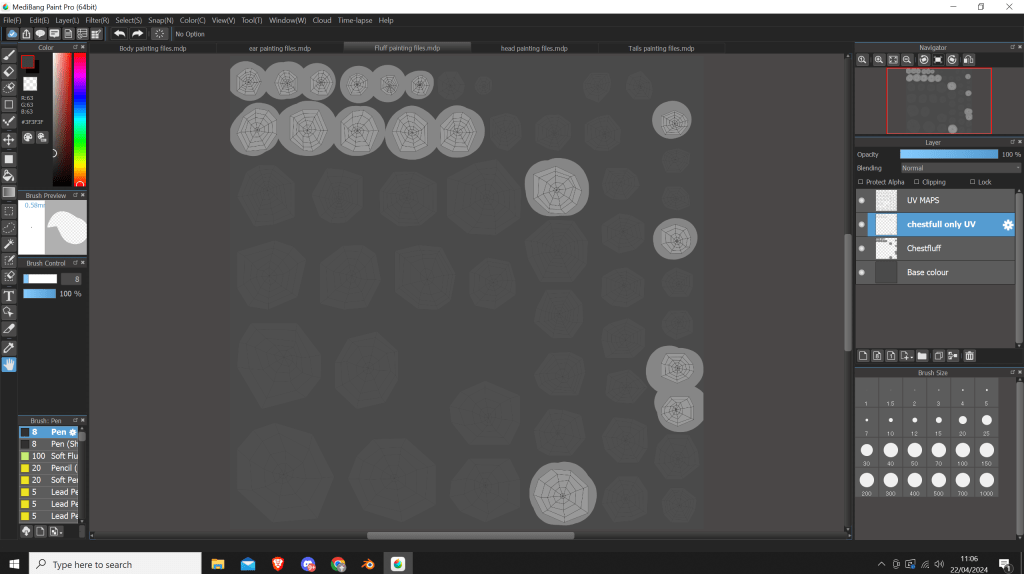
The fluff was not so easy to unwrap. I basically had to sort out these cobweb shapes by hand, as the unwrap tool was not doing a very accurate job. I would have saved myself a lot of time if i had UV unwrapped the fluff before duplicating the mesh and modelling the fluff. This would mean that all the fluff UVs would be unwrapped and identical. All I would have had to have done is move them all to their own spot so they aren’t overlapping.
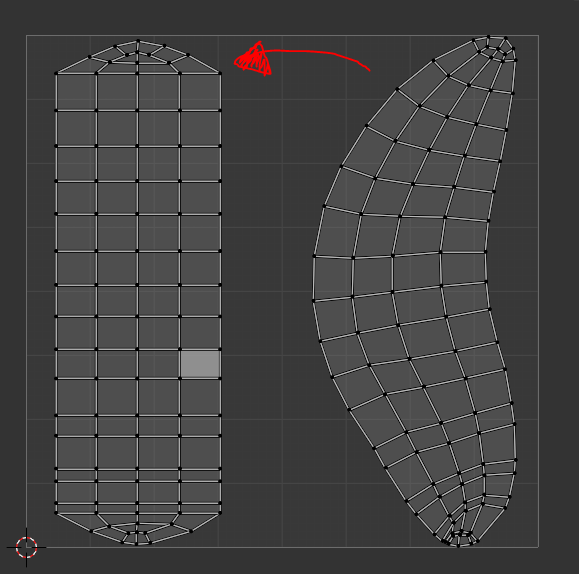
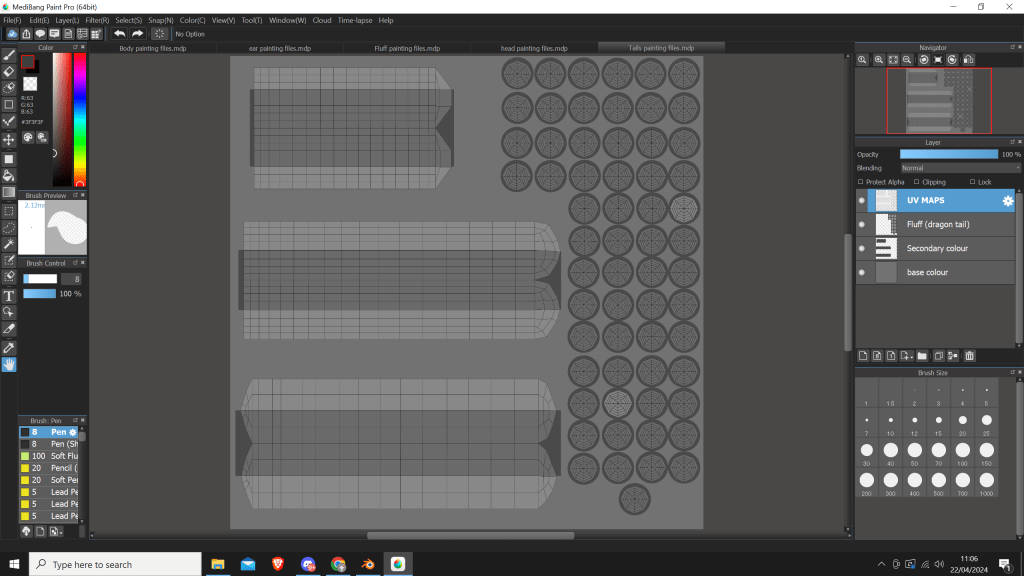
For tail UVs, I used a plugin called UV squares. This automatically straightened out the UVs, which will make 2D texturing super easy. It also makes it easier to line up the seams to avoid patterns on the textures not quite lining up.
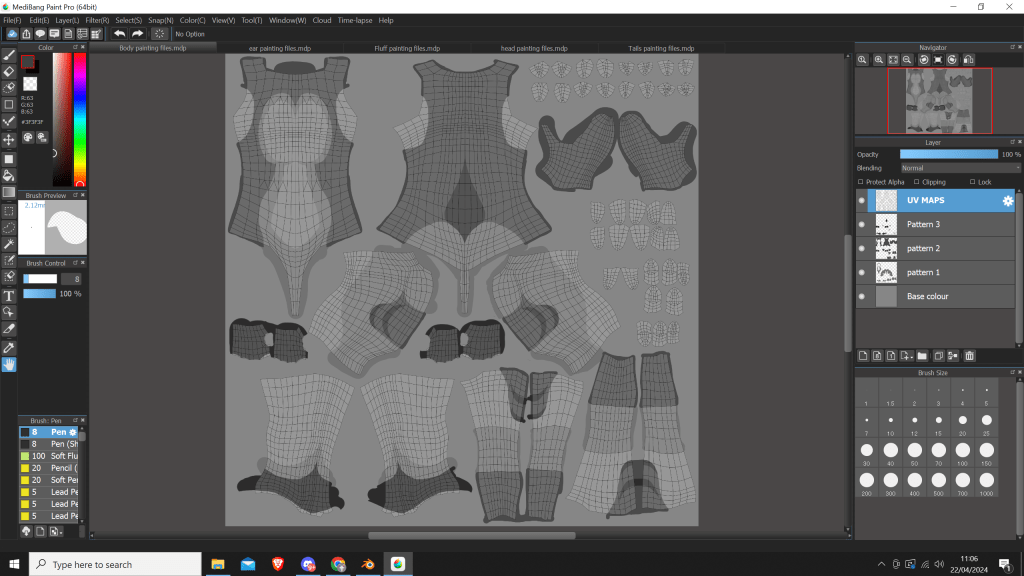
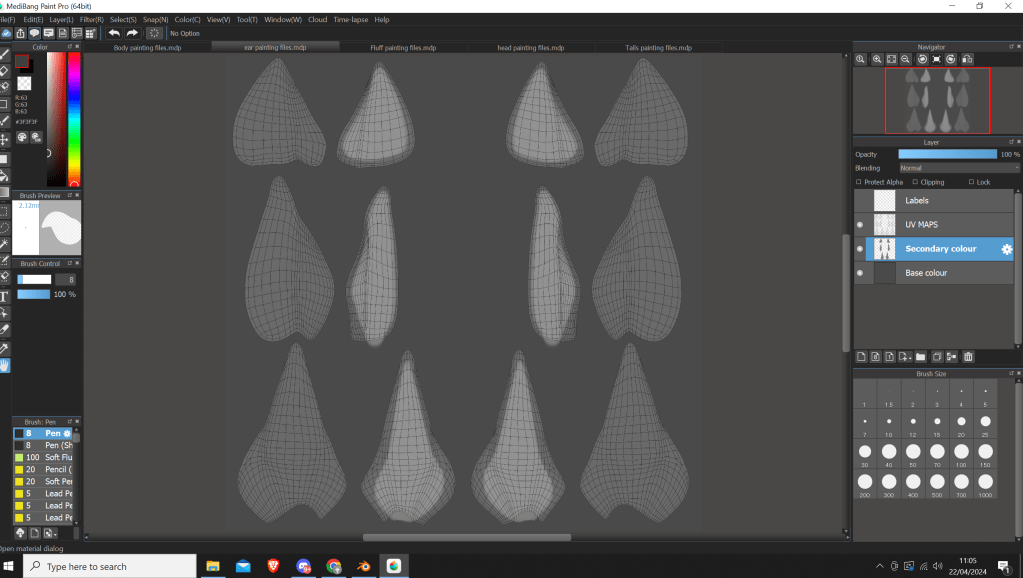
Once the UVs were done, I started painting some patterns, and created some files in medibang paint pro. Whilst medibang isn’t the most popular too as I mentioned earlier when I did my reference drawingsl, It can export its final files to PSD, which is very important for my project. This gives anyone who wishes to paint in 2D the ability to paint in any painting program they want, so long as it supports PSD files.
I separated the 3 main colours into different layers, so its very easy to recolour the default textures to something original, even to a newbie who might not be very familiar with any form of digital painting. I also made sure to layer the UV maps on top of everything, so 2D painters have a good reference about where the seam edges are. You can see the layout here.
I did also UV unwrap the paw pads and the claws, however I didn’t create any texturing files as I intend to just keep them a solid colour, probably with a matcap effect.
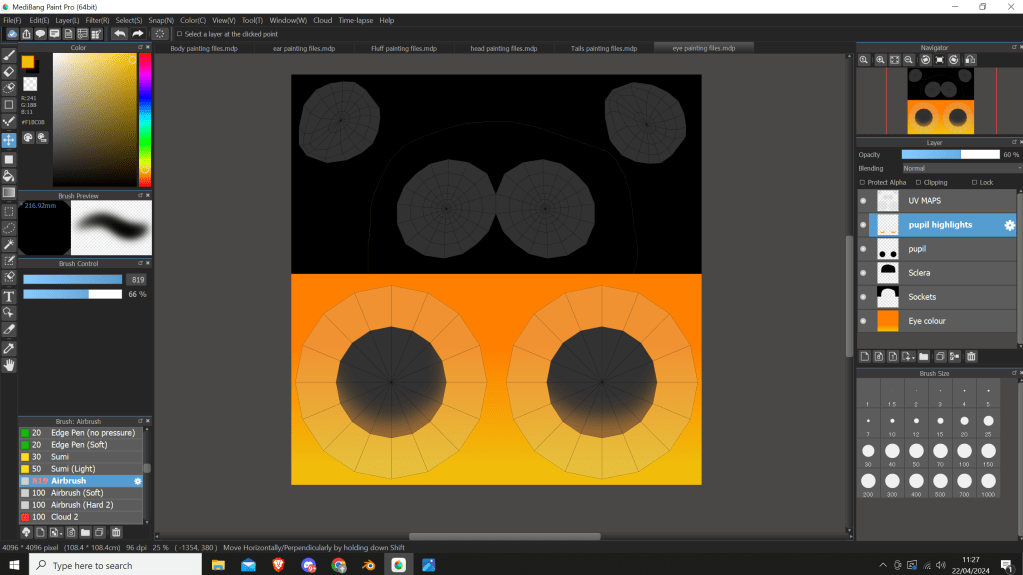
Here are what the final textures look like:

Overall I was super happy with these textures. I like how they are fairly simple, yet still look pretty cool. I love how the detail on the inside of the mouth and tongue turned out. The texture files are super easy to use, which is also a bonus, as it will encourage beginner creators to try my product.
I also found this great tutorial which just popped up in my youtube recommended. I decided to give it a go on my skullbeasts chestfluff, and I really like how it turned out. It just makes everything blend so much better.

On the topic of normals, I decided to try something I’m not very familiar with, which is the process of baking normal maps from a high poly mesh, onto a lower poly mesh. This is really good as it allows you to capture detail on your optimised mesh, and make it look more detailed than the mesh actually is. This is because normal maps tell lighting how to interact with the mesh, so you can create realistic looking bumps and scratches. This technique is used in almost all realistic games.
Before I did this however, I first needed to subdivide my model until I had a few million polygons total, and then start sculpting detail using the sculpting tools within blender.


I tried to go for a more muscular look, as I thought it fit this characters more intimidating aesthetic.
Next I followed this tutorial to bake the high poly detail into normals for the lower poly mesh.
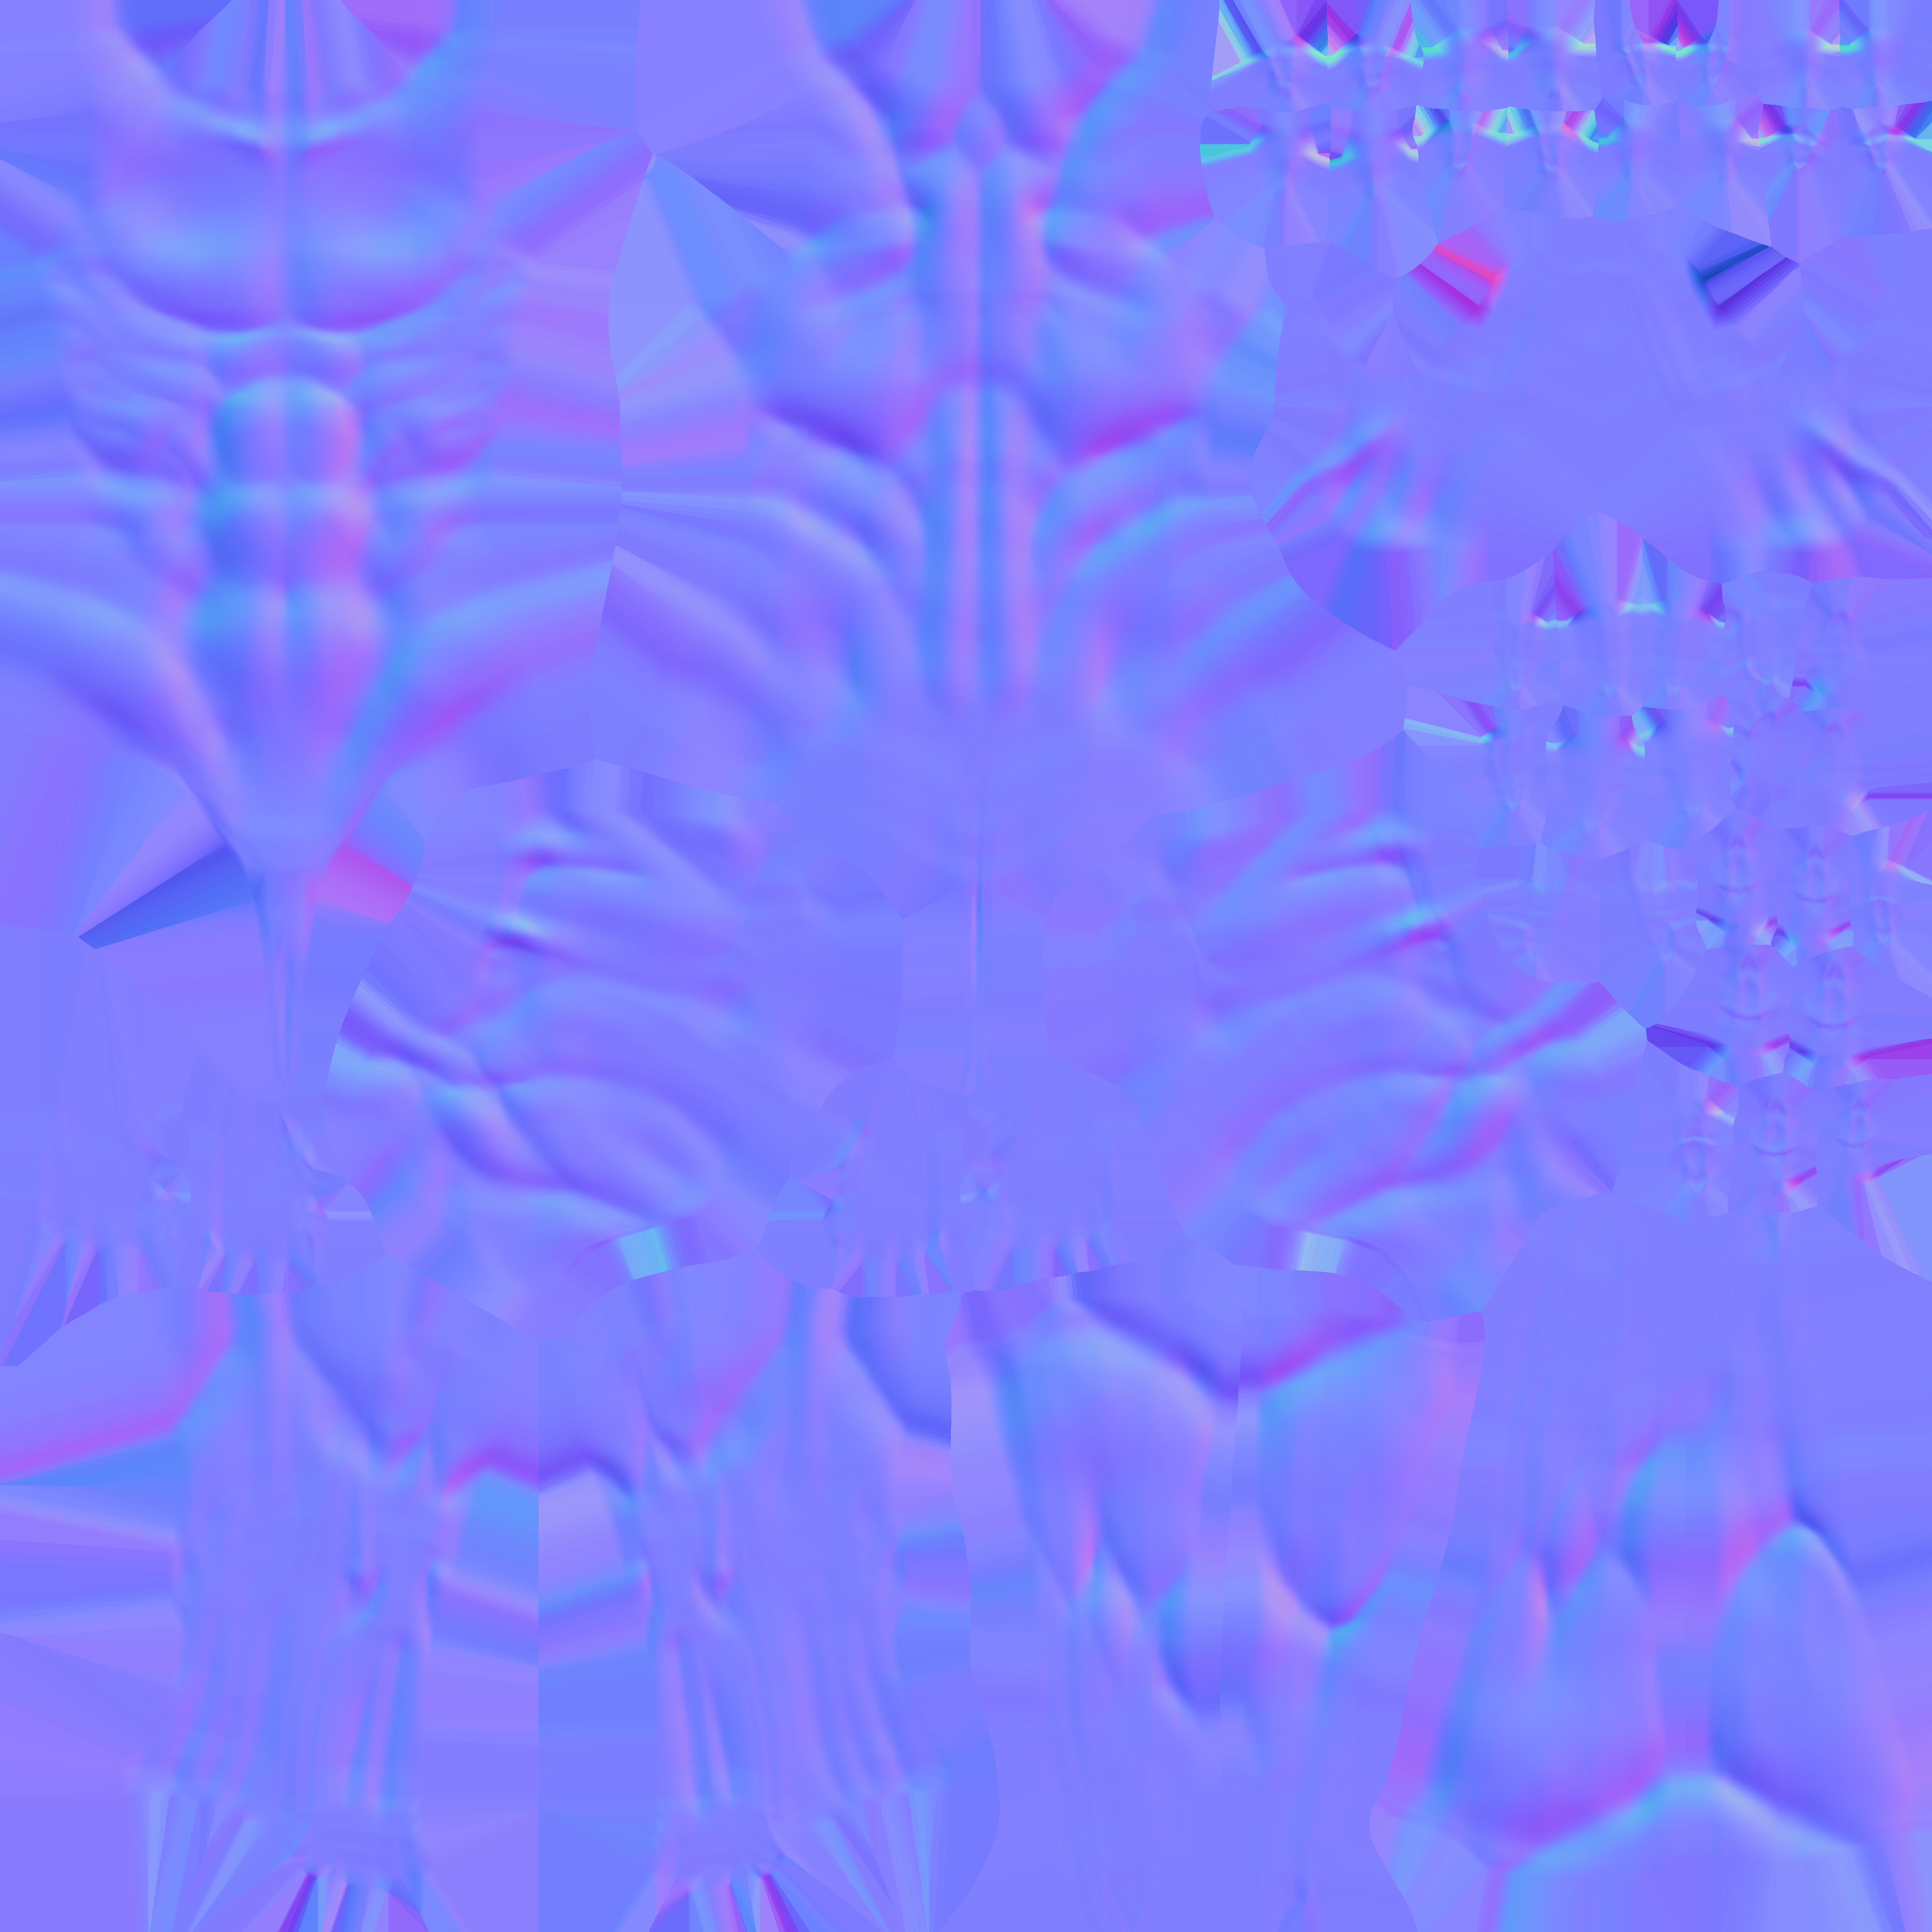
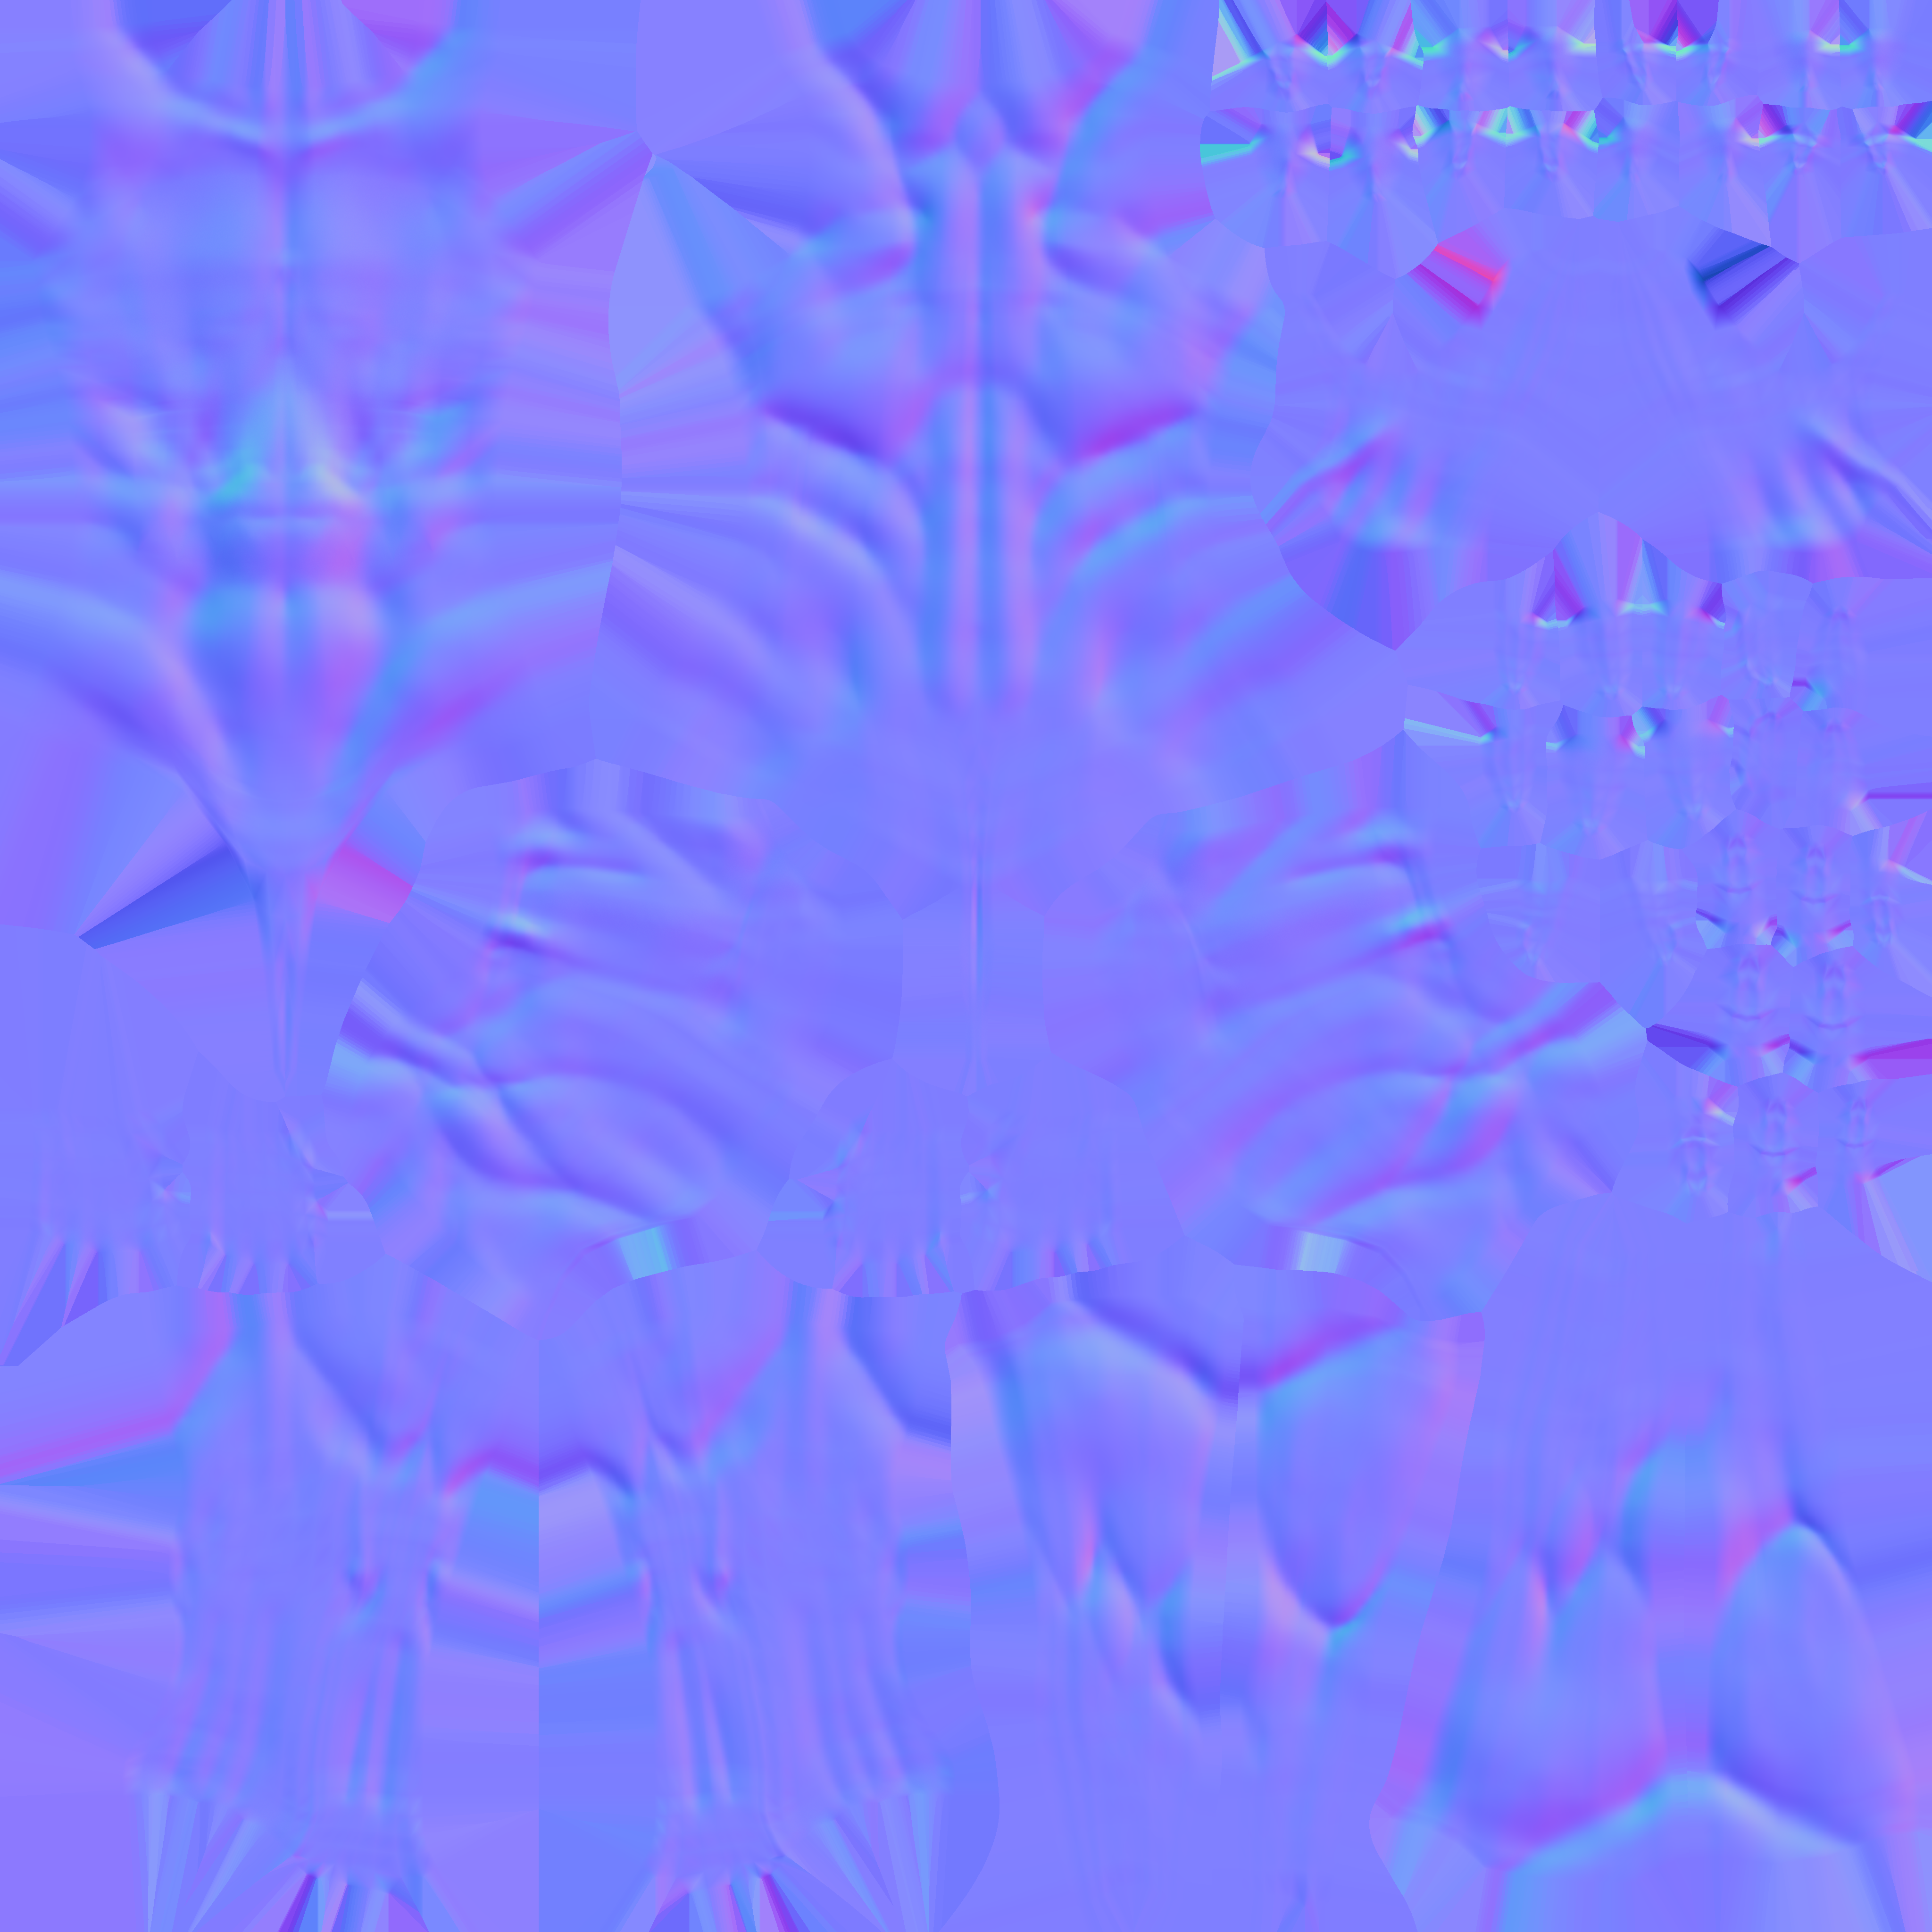
I made two separate normal maps. The second version has a flatter upper chest, which looks much better when using the female shapekeys.
Here is a quick render I did using the lowpoly mesh with the normal maps, to showcase how these files effected the main body.

Week 8 – Starting the unity project files
First of all, I imported all of my FBXs files, and imported a couple of useful unity plugins.
- VRCfury plugin (https://vrcfury.com/)
this is an essential addon for people creating vrchat ready products. It allows you to speed up the process of toggle making, and animating specific elements of avatar creation by adding object components in the inspector tab. - Poiyomi shaders (https://www.poiyomi.com/)
Poiyomi shaders are open source, and free custom shaders to use in unity. There is a paid version called poiyomi pro, which has a more restricted license, however I will be using the free, open source version. - VRChat SDK (https://creators.vrchat.com/avatars/)
All of the components and scripts required to make a VRChat avatar function
Once everything was imported, I set up the shaders. I used the rim lighting feature, and the outline feature that poiyomi has included to make my character stand out a bit. It creates a really nice effect on the fluff.
You may also notice that the ears and tail are not attached. This is intentional as I wanted to create a drag and drop system, where the users can choose which style of ear and tail they want.
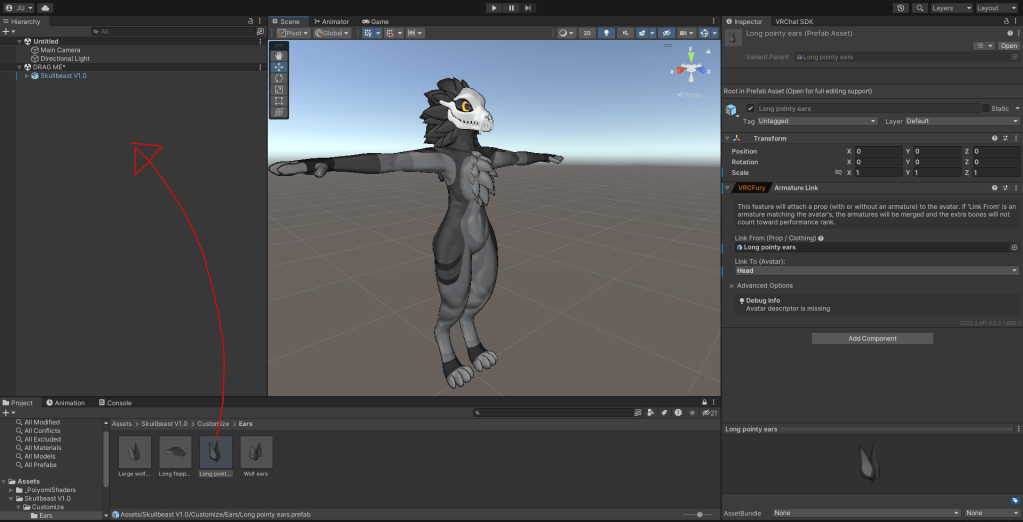
I used vrcfury to add an armature linking component to the prefab, so now the ears will parent automatically to the head bone when you drag and drop it into the hierarchy. This keeps the customisation process super simple. It is the same process for the tail, and future clothing assets I have planned.
Next I sorted out the animator layers, and the VRChat components.
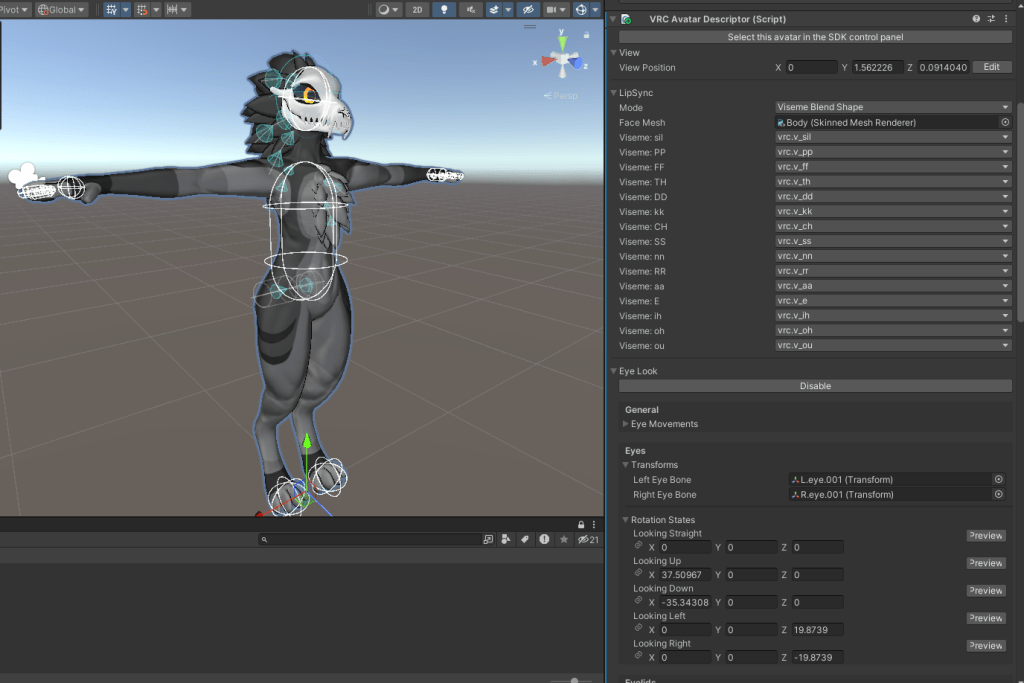
The avatar descriptor component controls all of the main basic features of how the character will react within the social VR game VRChat, such as eye movement, blinking, colliders, viseme mouth movement and holding all of the animator layers and parameters.
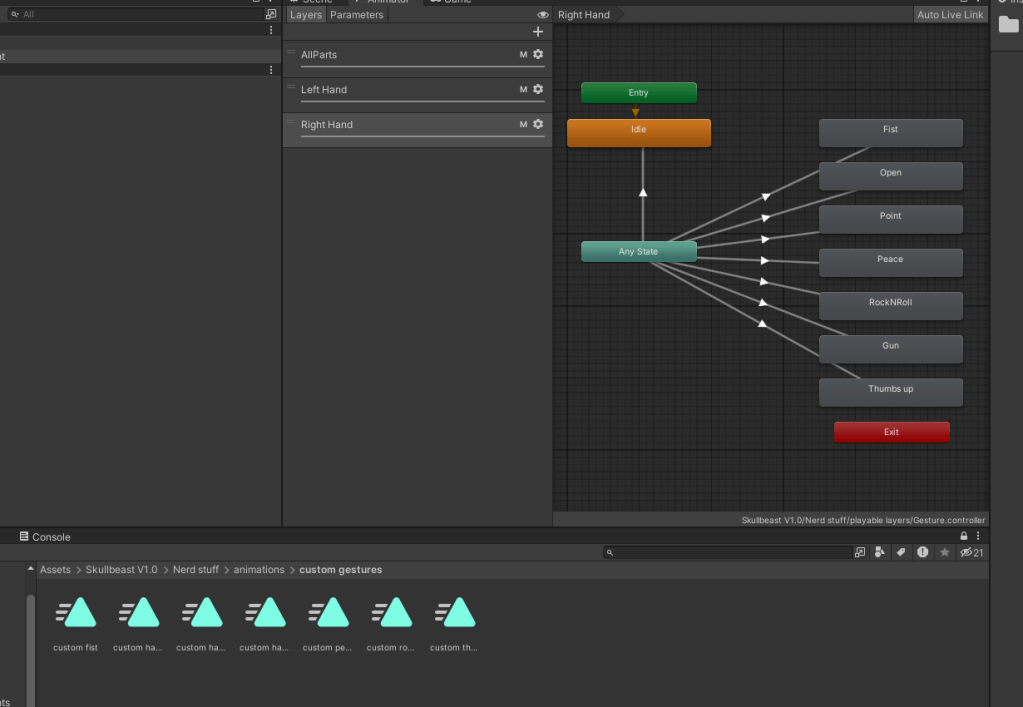
Using a gesture layer template in the VRChat SDK, I created an animator layer which controls the way your fingers move when hitting certain buttons on your VR controller. I also made new animation files which contained keyframes for each different hand gesture
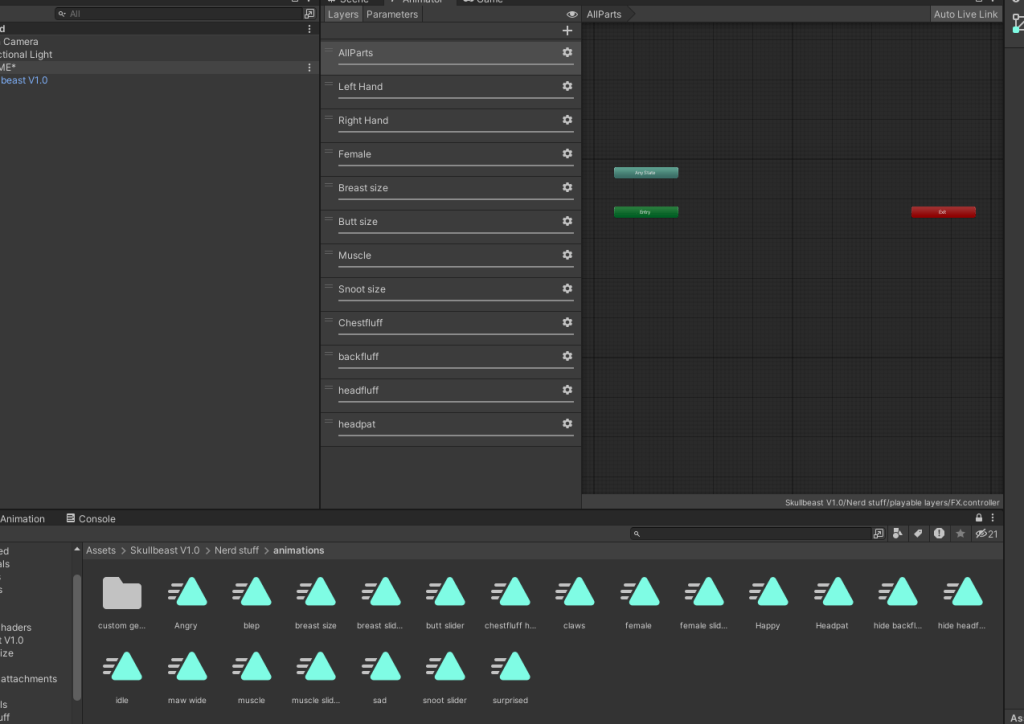
I next created the FX layer, which is used for more unique animations, such as radial shapekey animations, facial gestures, contact receivers and toggles.
I used this tutorial to help me with the radial animations, as I have only ever had experience making ON/OFF toggles using Boolean parameters.
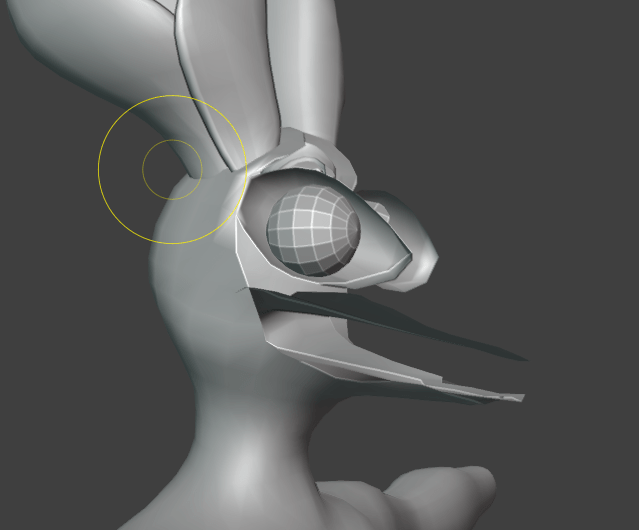
Finally I added phys bone components, which are part of the VRChat SDK. These allow me to add physics to stings of bones. These are great as they add so much more life into your character, and can even be interacted with by yourself and other users in game. They just help bring the character to life a bit more
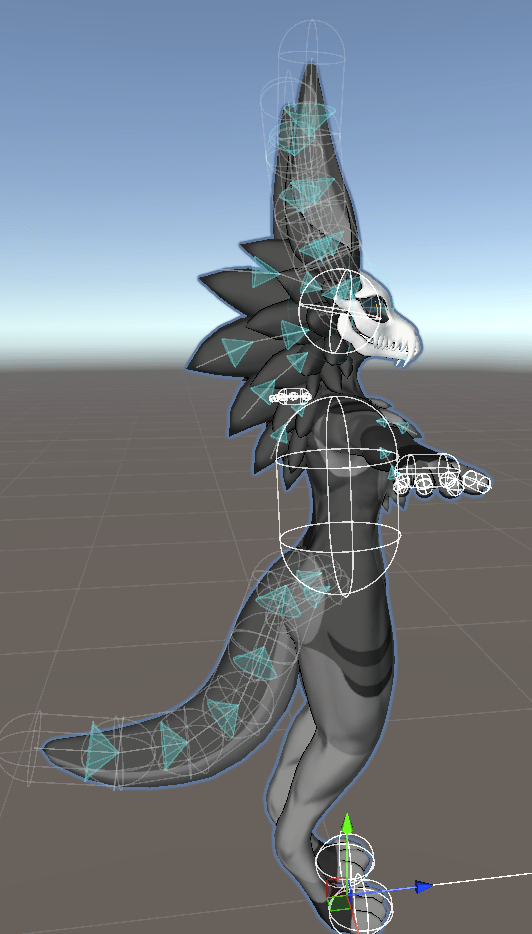
You can see the phys bones are the ones with the blue cones on them. The blue cones represent the maximum angle that the bone can rotate in.
From this point the unity files were basically finished. So I exported the folder as a unity package. This means people who want to use my model simply have to create a new unity project, and drag in my unity files, and its ready to go. This fulfills my goal of creating a project that is easy to use!
Week 9 and 10 – Testing the files, photographing in game, rendering, and showing off the finished product
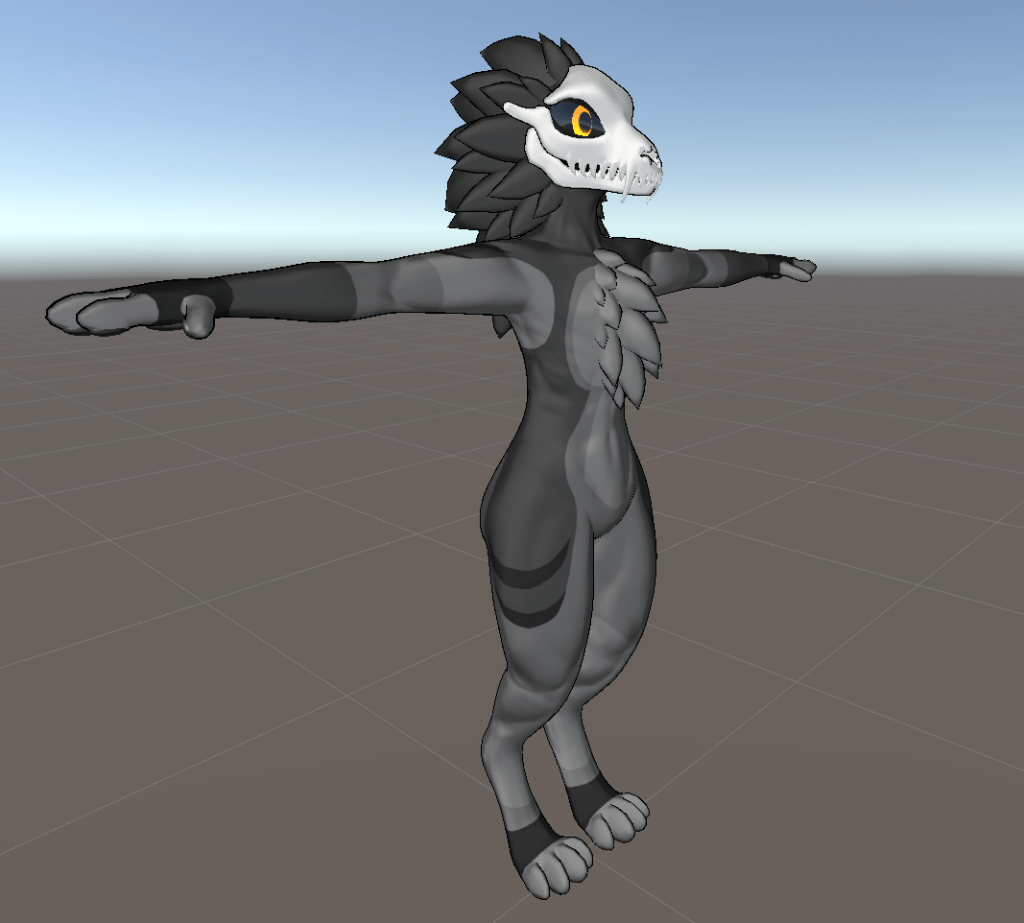
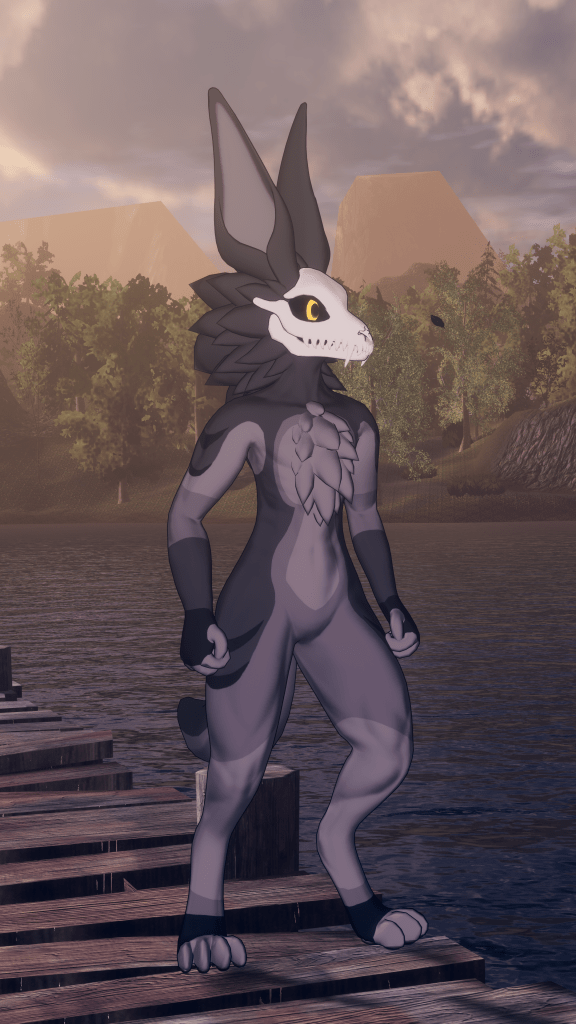
Here are finished renders and videos I made to showcase all of the products features!
These pictures and videos were taken using Unity, and the VRChat SDK!
Renders taken from unity
Short video demonstrating the VRChat SDK features and fullbudy rig:
Screenshots taken within the VRChat game


Community and peer response:
As I was rendering, and taking pictures of the finished project, I sent the files to a couple friends in my discord server and asked for their advice on how easy the setup is, and what they think of the finished avatar.


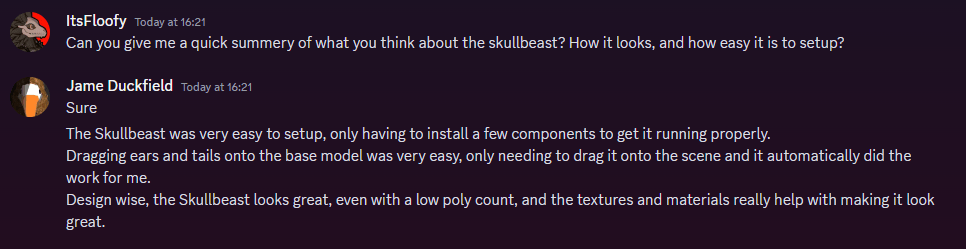
All 3 responses mentioned the easy setup, which was one of the main objectives I had set myself. This shows that my target audience was satisfied with the final product. I will also be releasing this avatar base to the public, with hopefully a few additional clothing bundles. I will be able to get a deeper look into my target audience and their opinions on it, once people start using this thing on a wider scale.
My personal thoughts and conclusions?
I am really happy with how this project turned out. It looks amazing, and better than anything I thought I could create. The rig is flawless, and the model just looks so professional in my opinion.
When I look back onto the checklist I made at the beginning of this project, I have nailed every single basic and essential feature that I wanted this project to have
However unfortunately, I didn’t get round to making any of the non essential features, which thing like clothing bundles were heavily requested by my audience.
I will be making them in the future over summer, however it is a shame I didn’t get time to finish the bundles within this 10 week time frame.
If I were to improve, It would be to try restructure my time better, so I could fit in a few extra non essential tasks.

Leave a comment